前言 Android Studio JDK
30分钟学会UML类图 - 知乎 (zhihu.com)
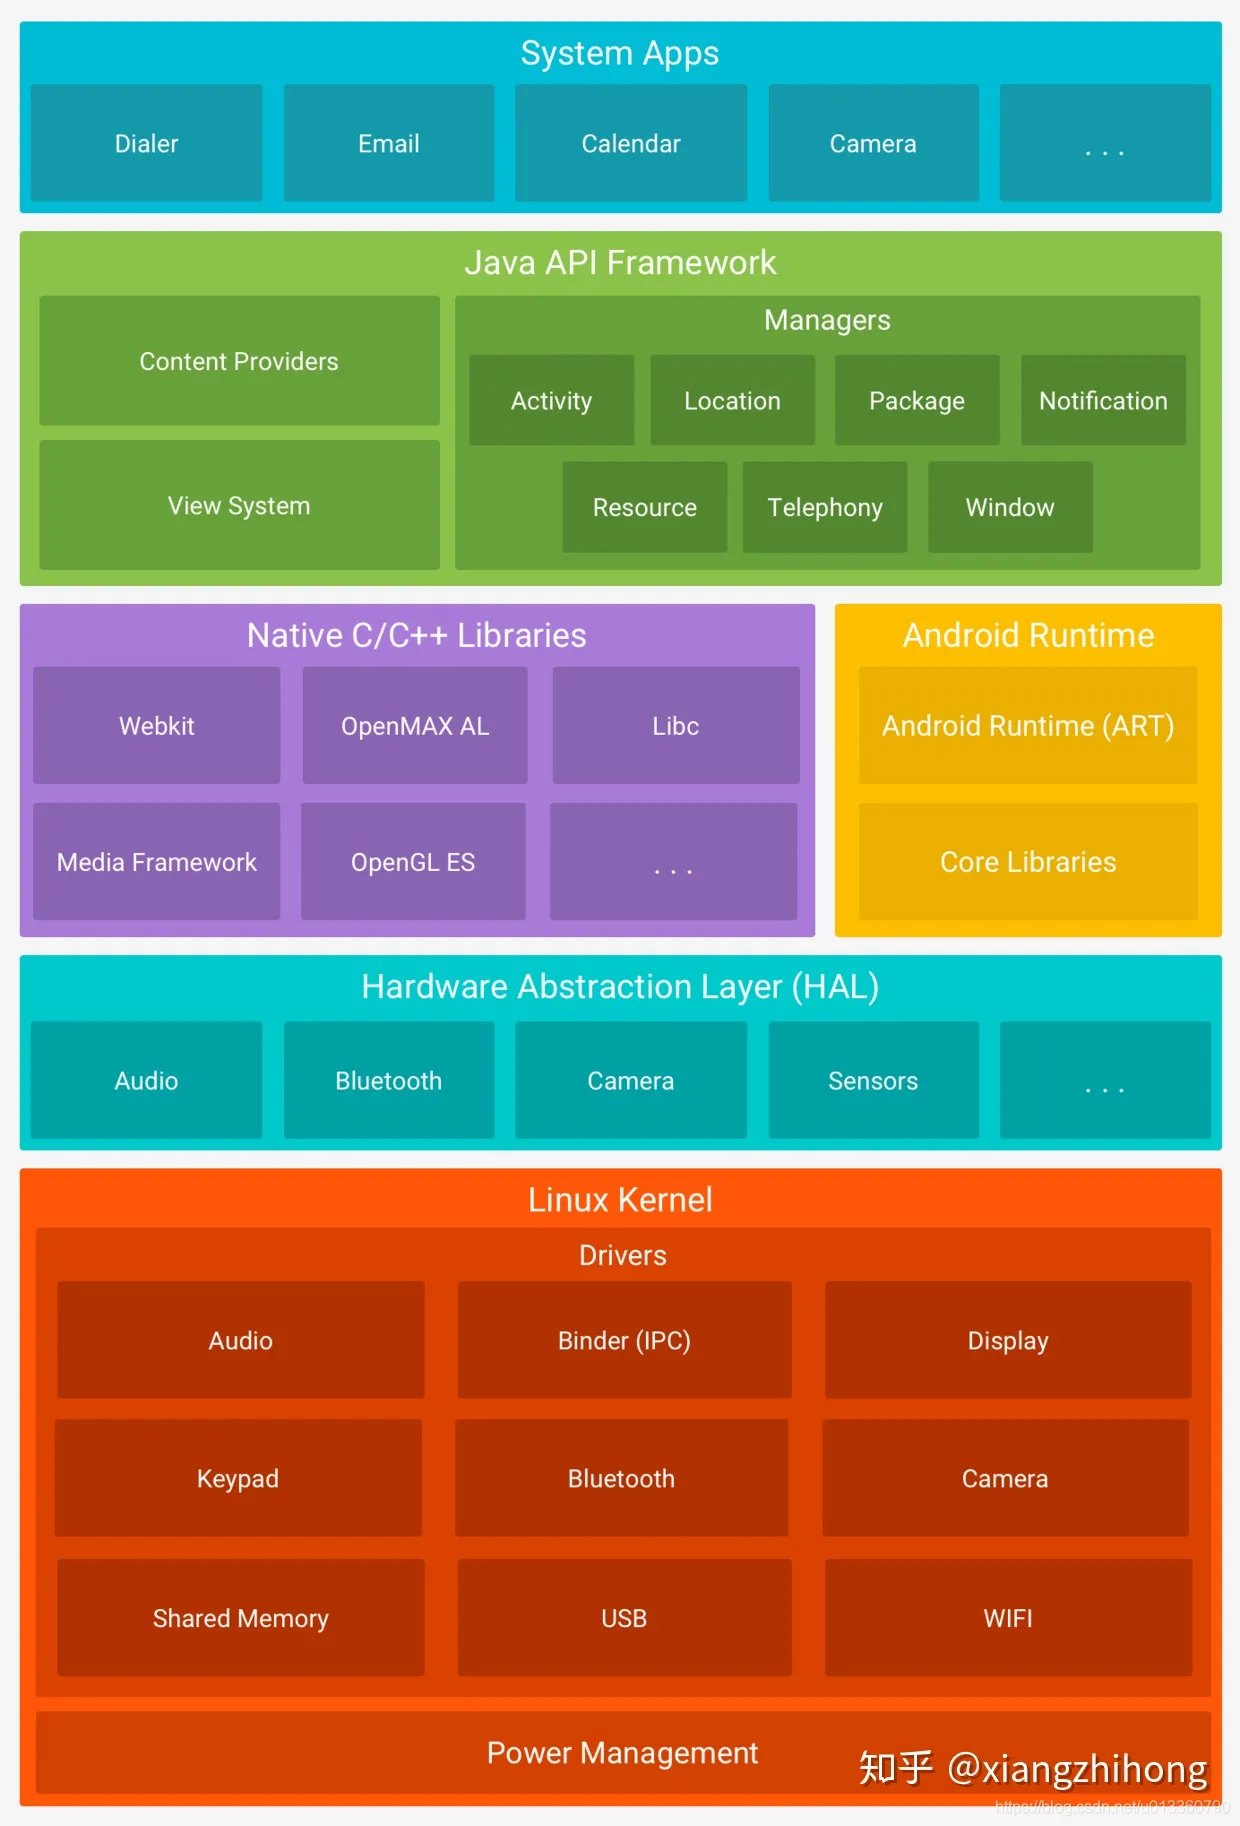
安卓系统架构图
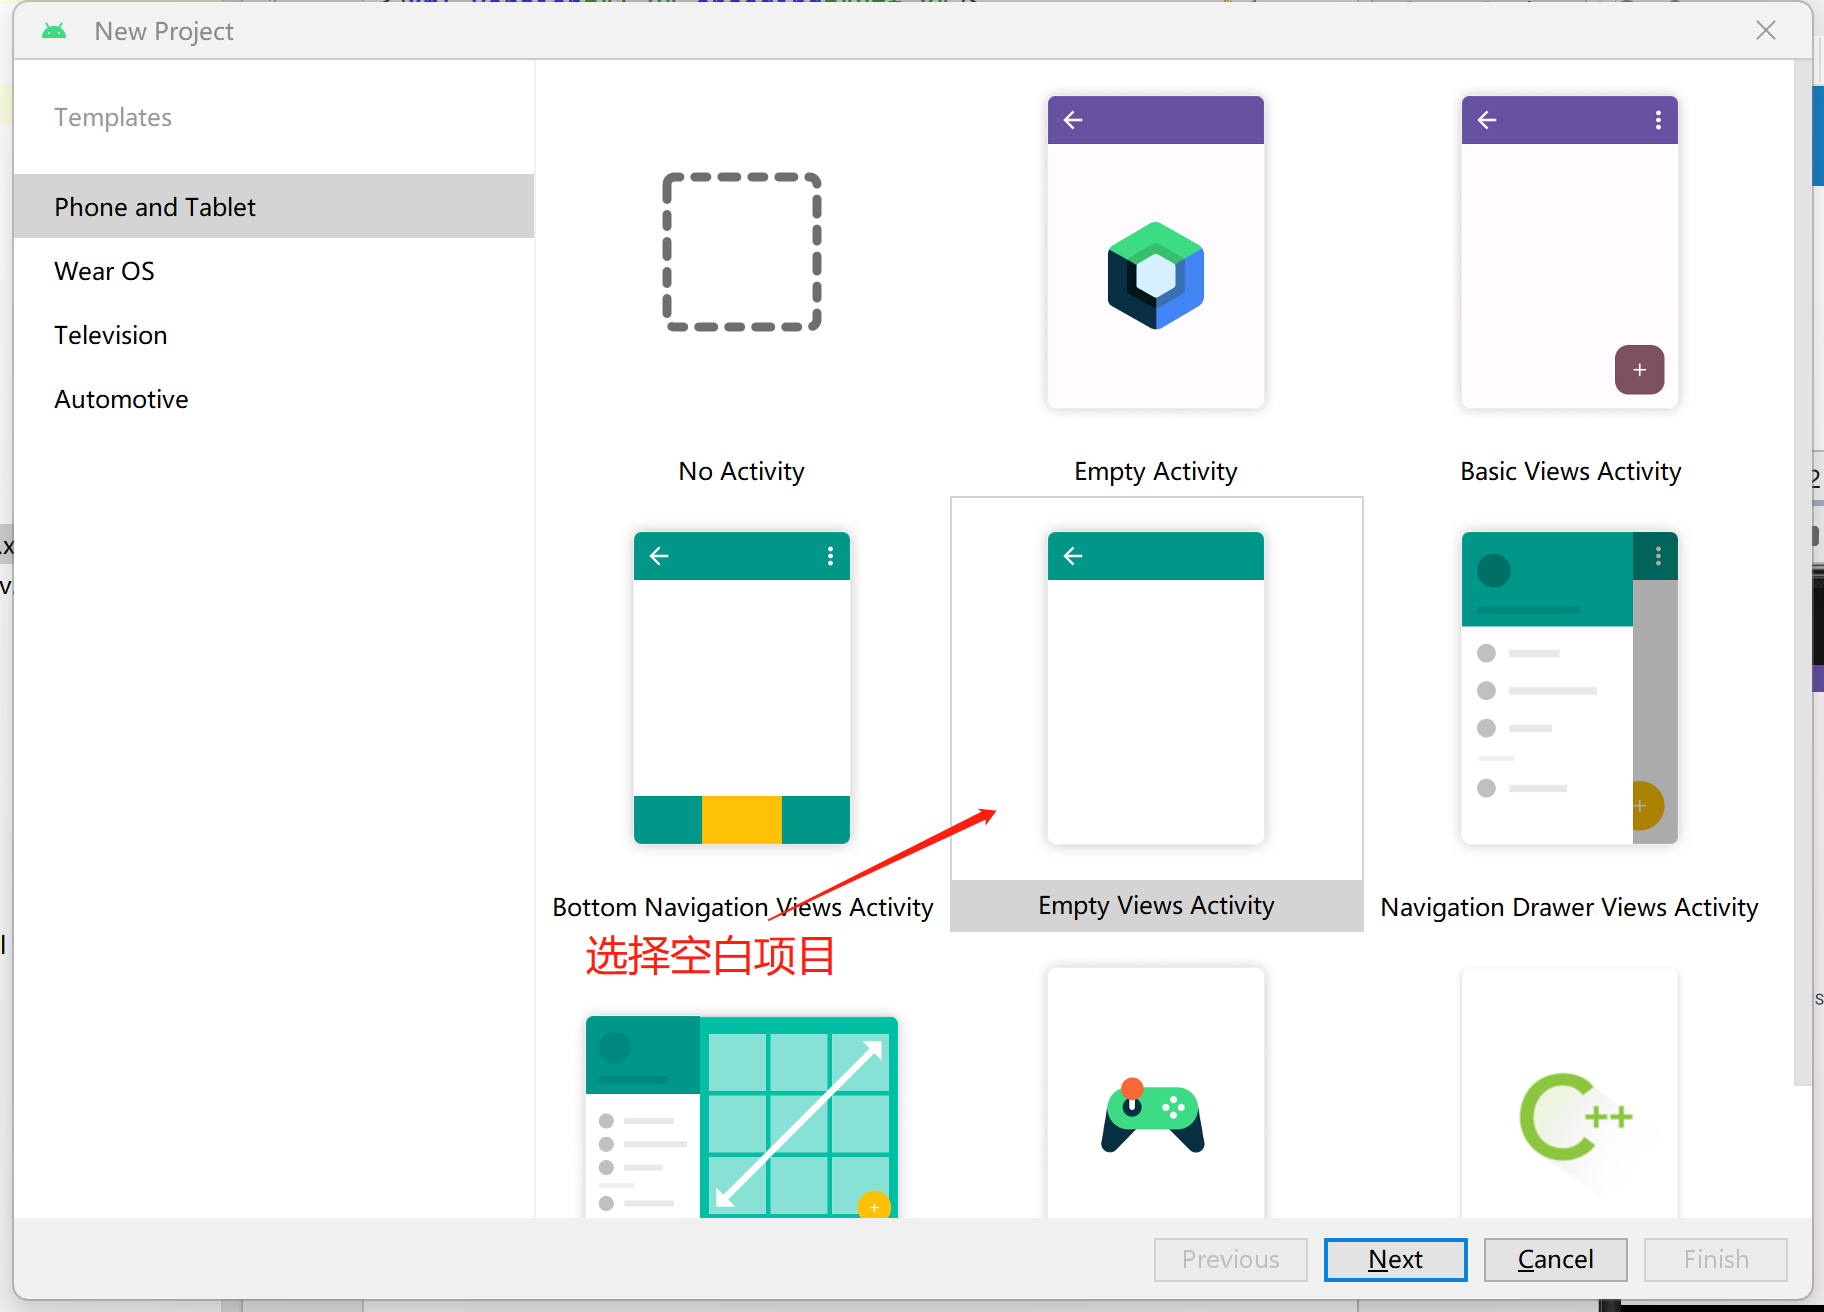
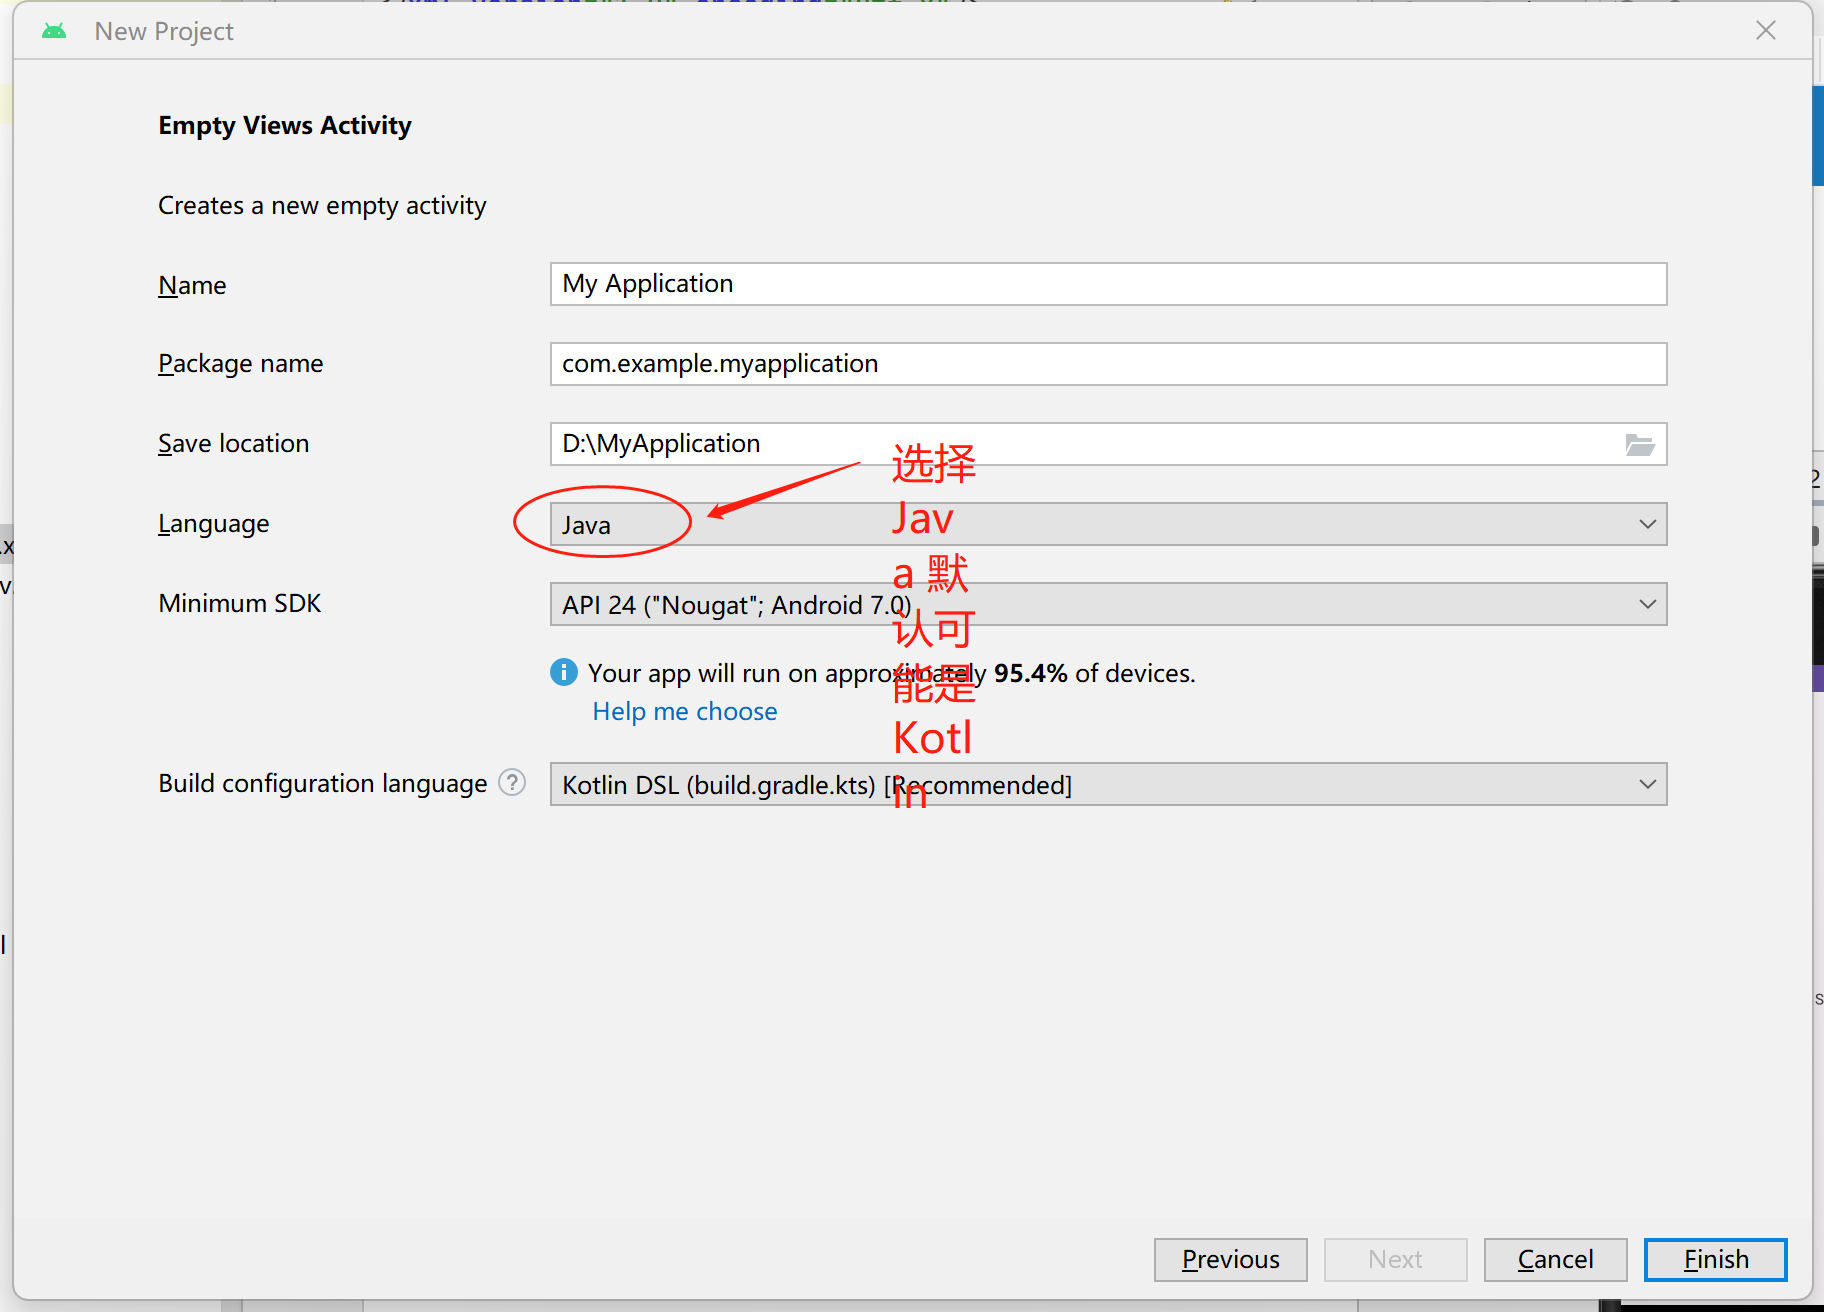
Hello World 创建新项目
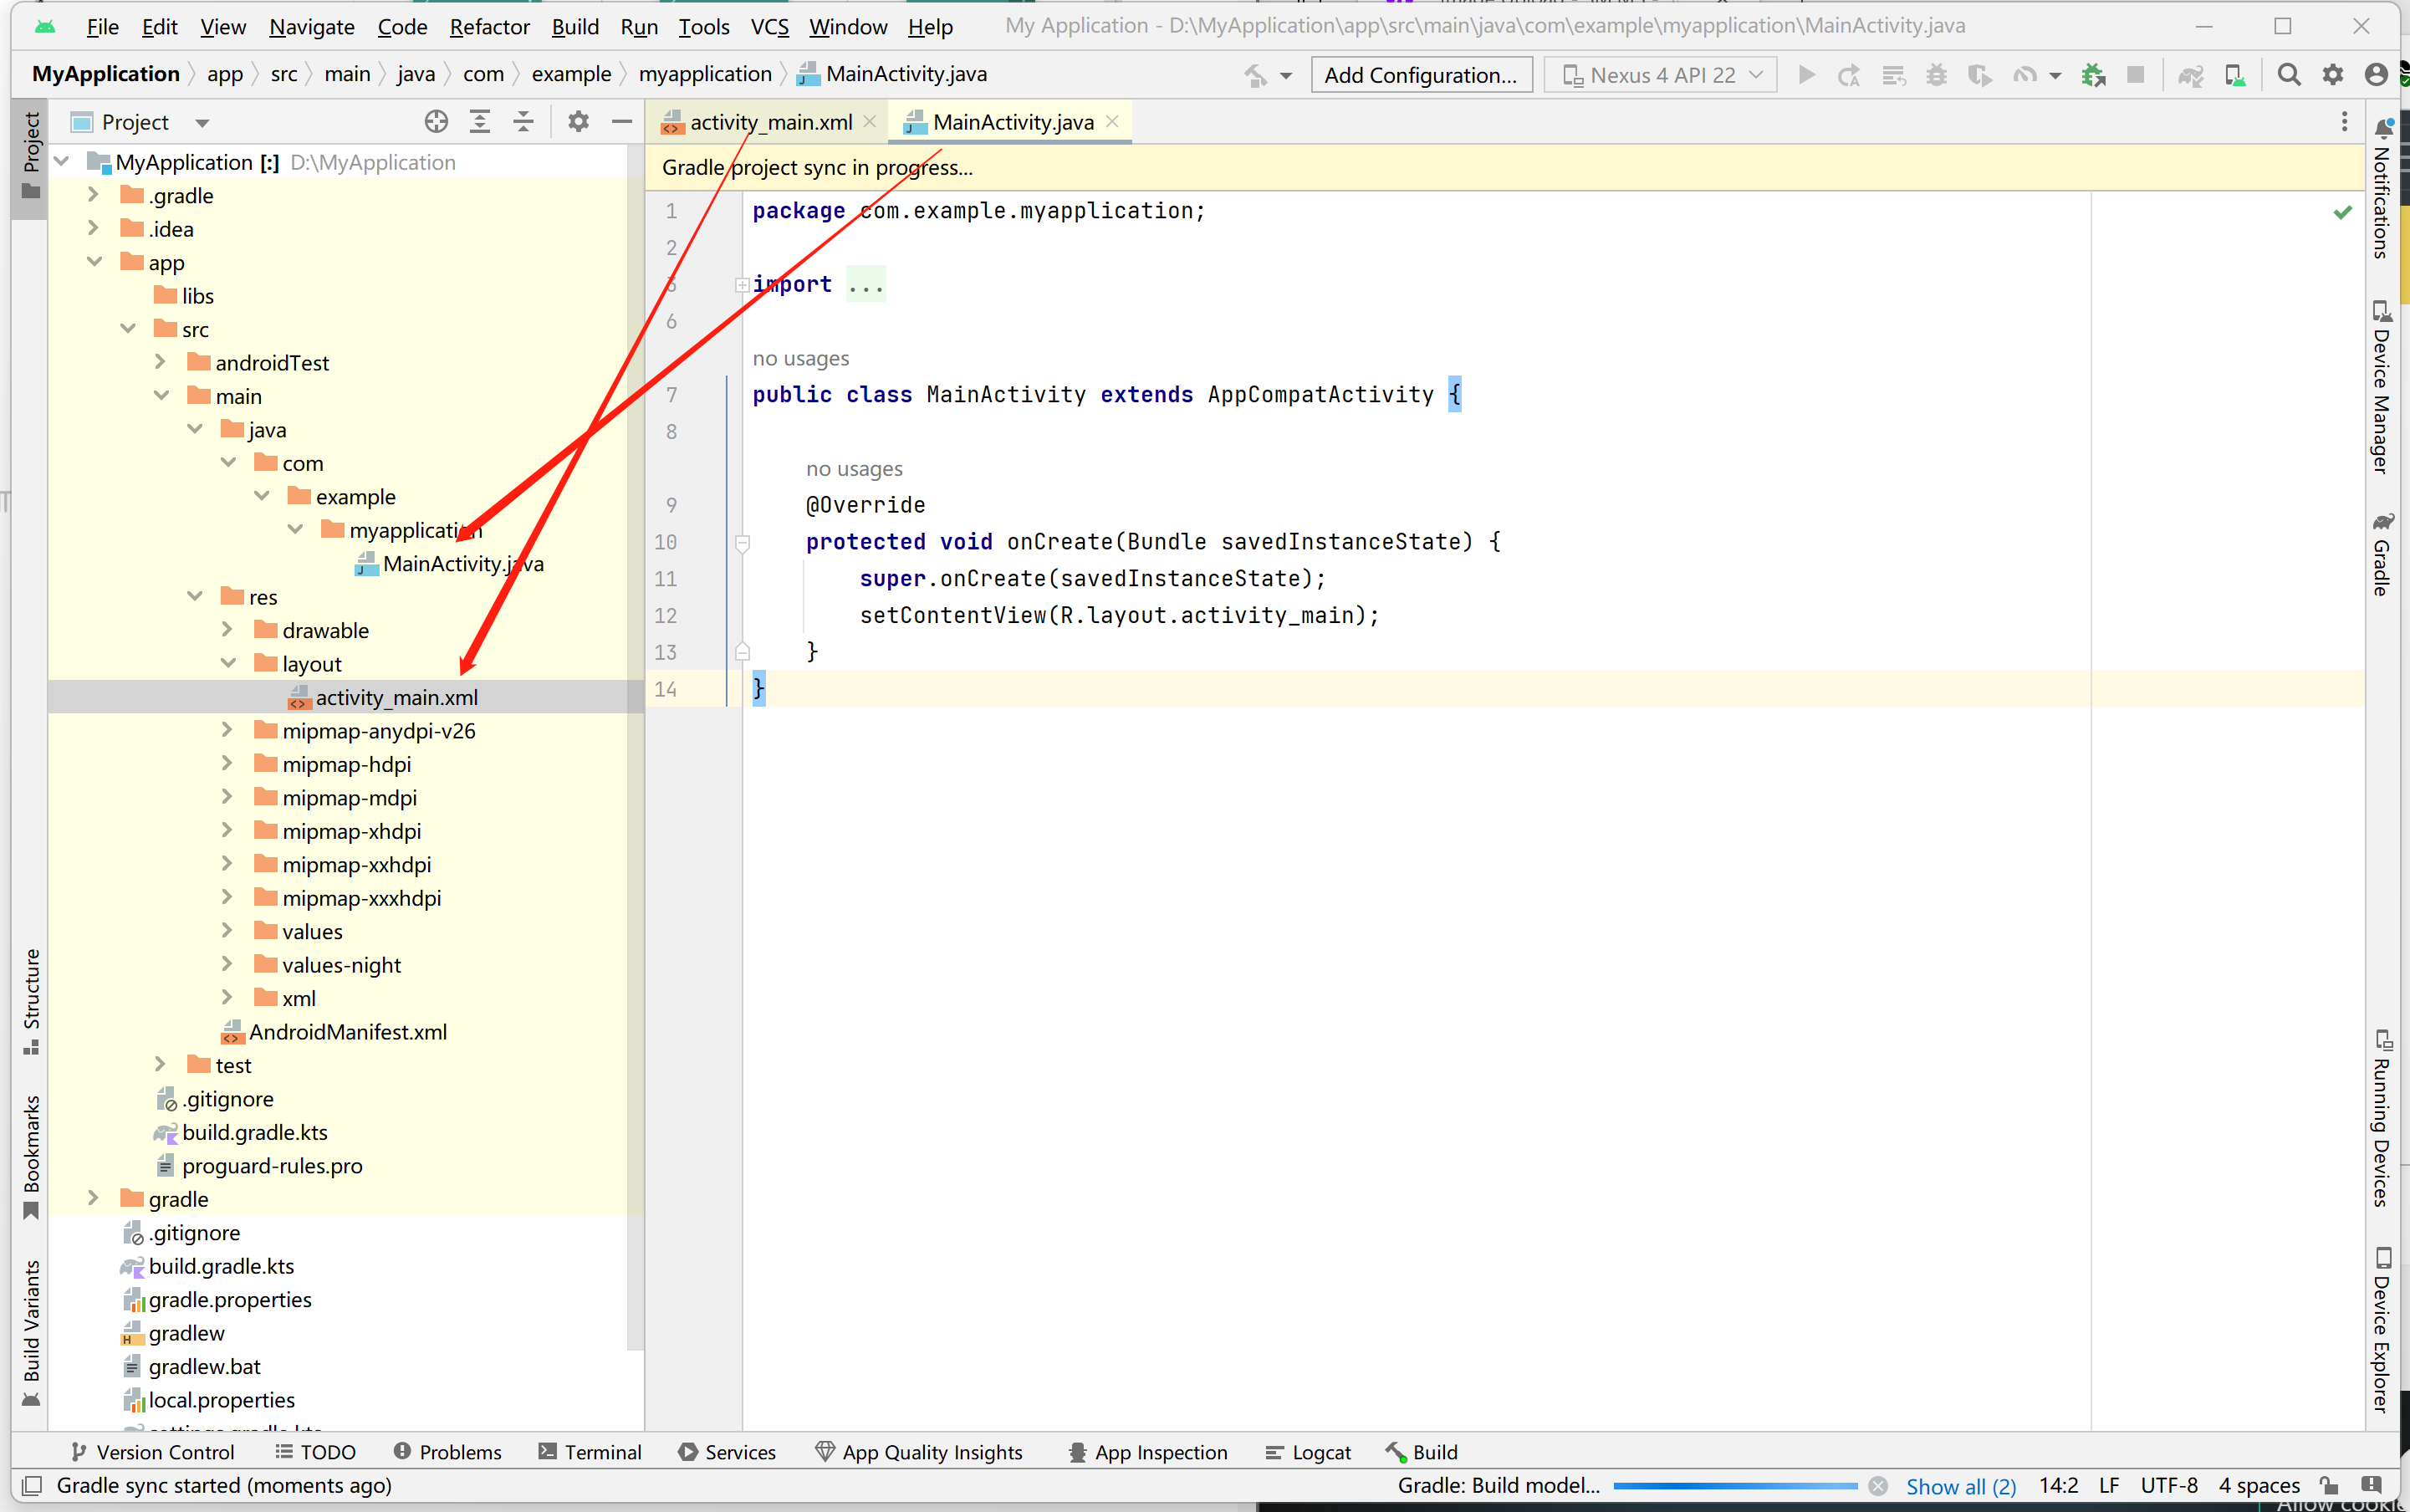
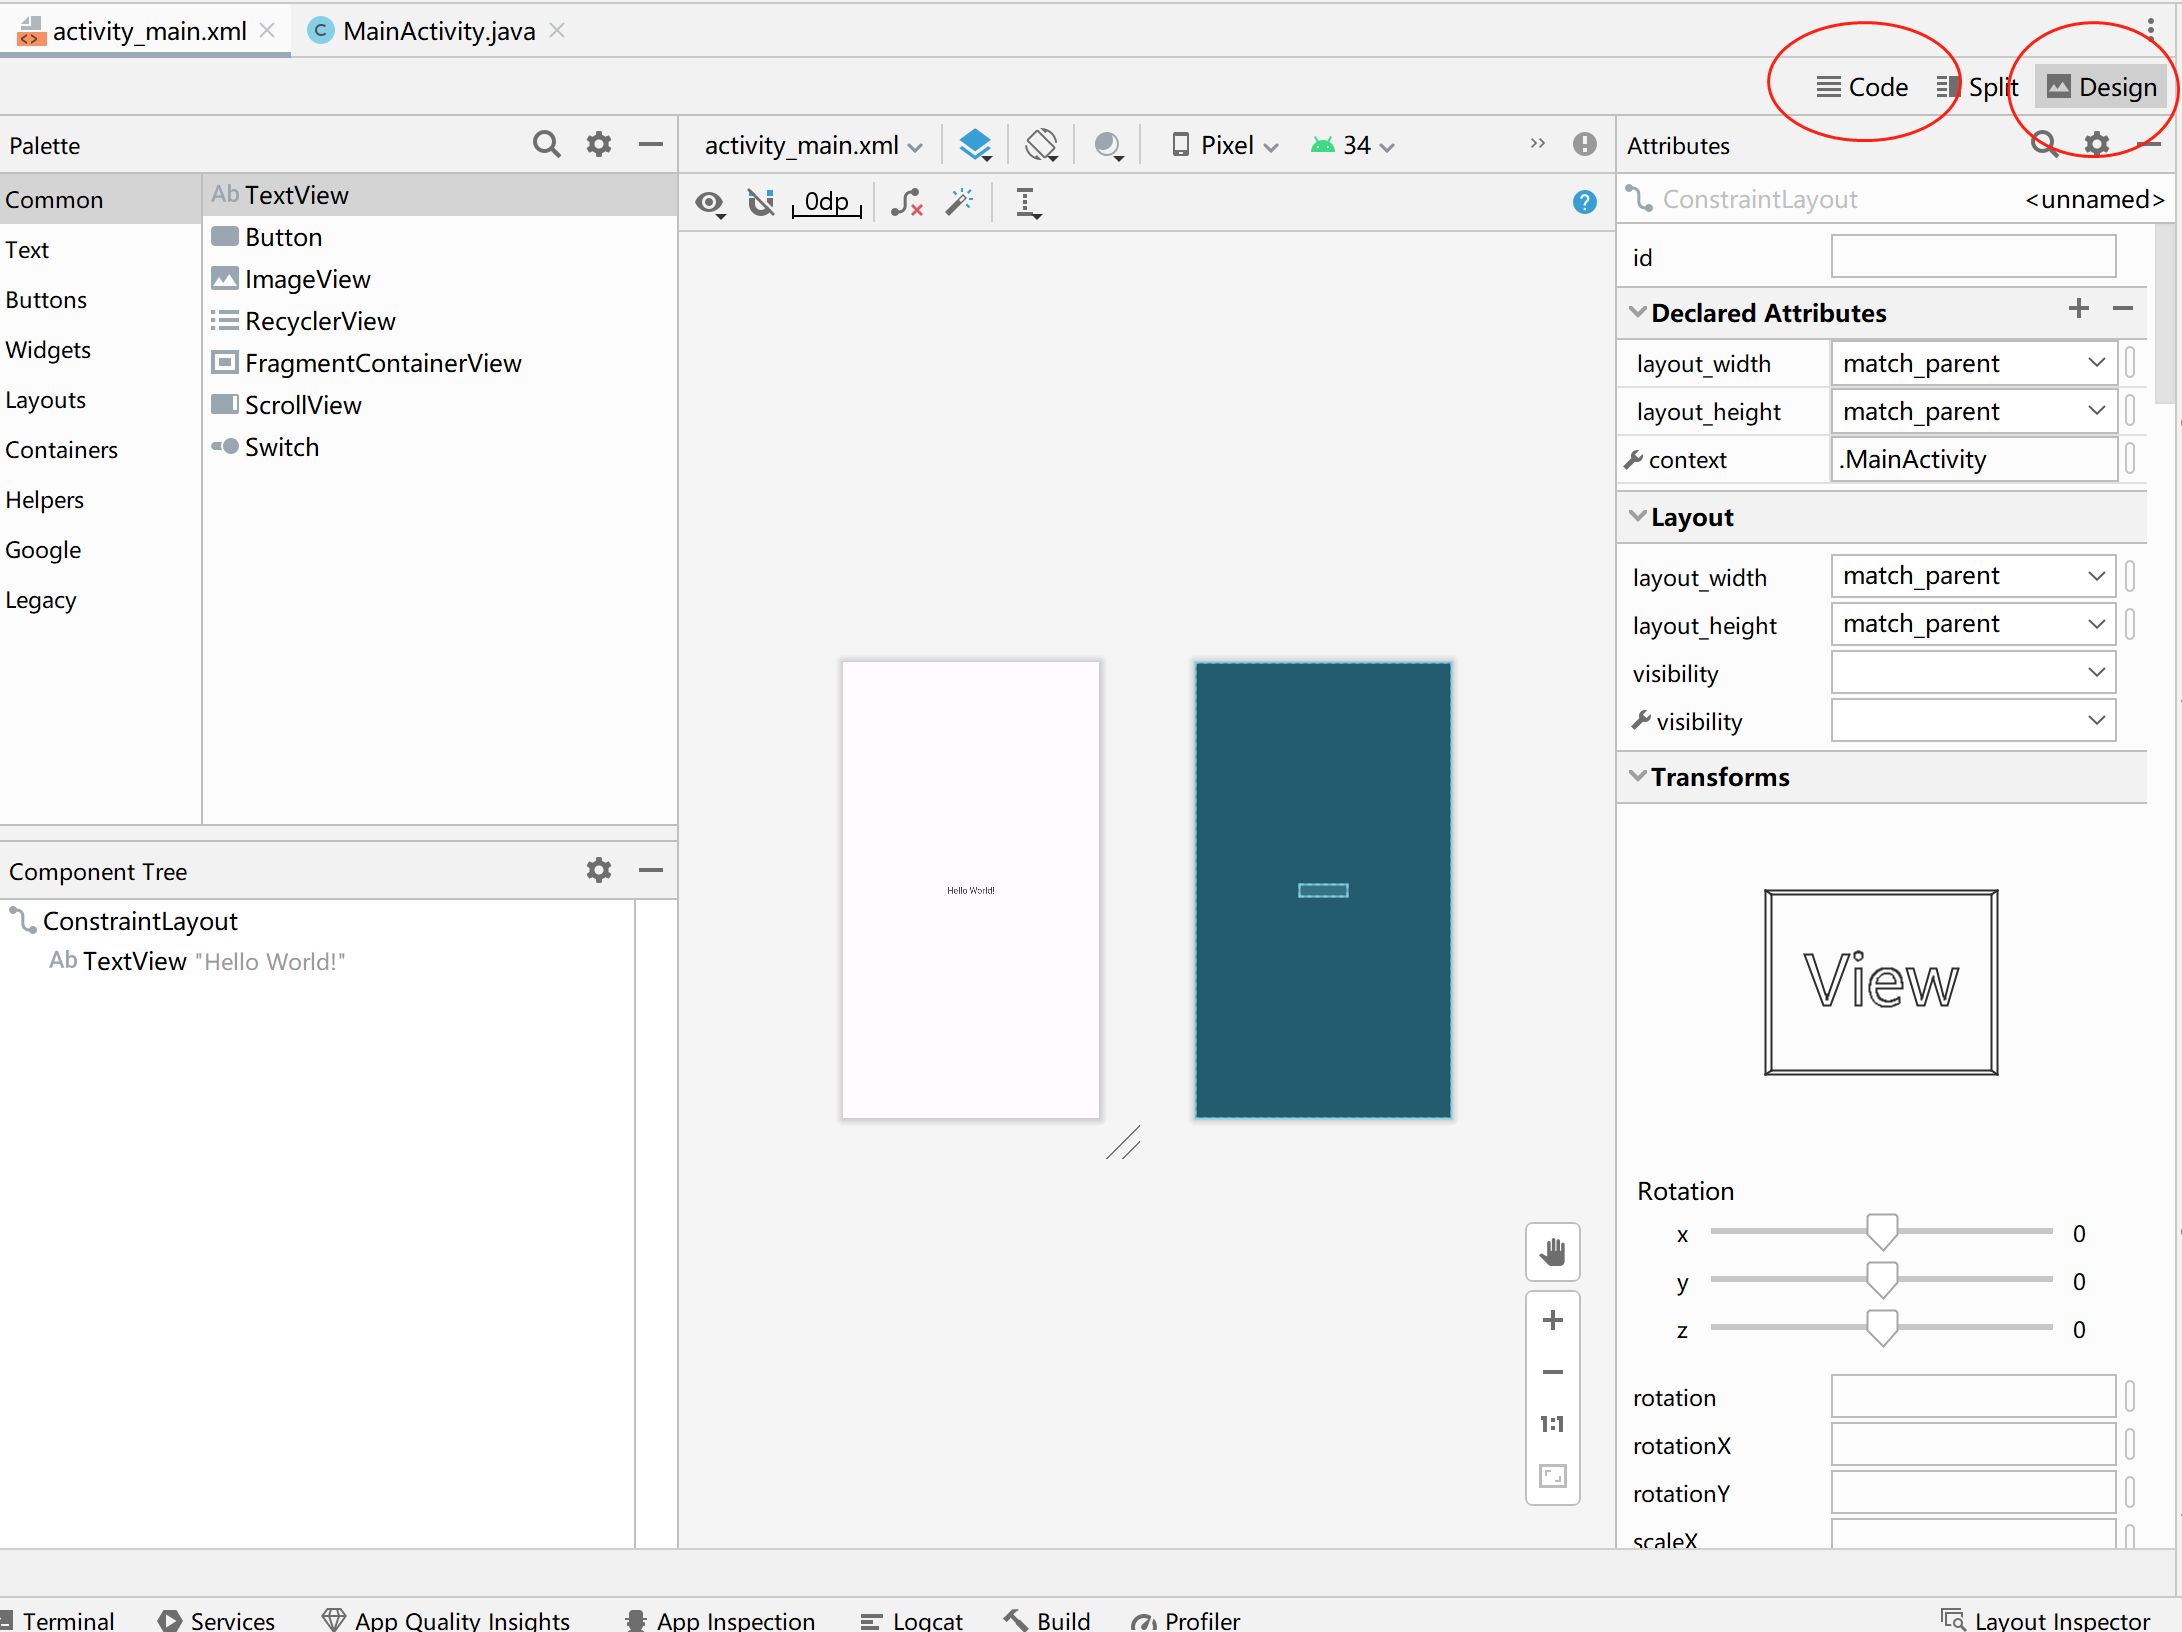
创建完成会自动打开MainActivity.java,AndroidManifest.xml以及activiyt_main.xml,如下图所示
其中MainActivity.java 是文件的主函数
AndroidManifest.xml:Android应用程序的清单文件,是整个Android应用程序的描述文件
activity_main.xml:布局文件,Android的UI界面显示的视图,所有的控件在这里设计
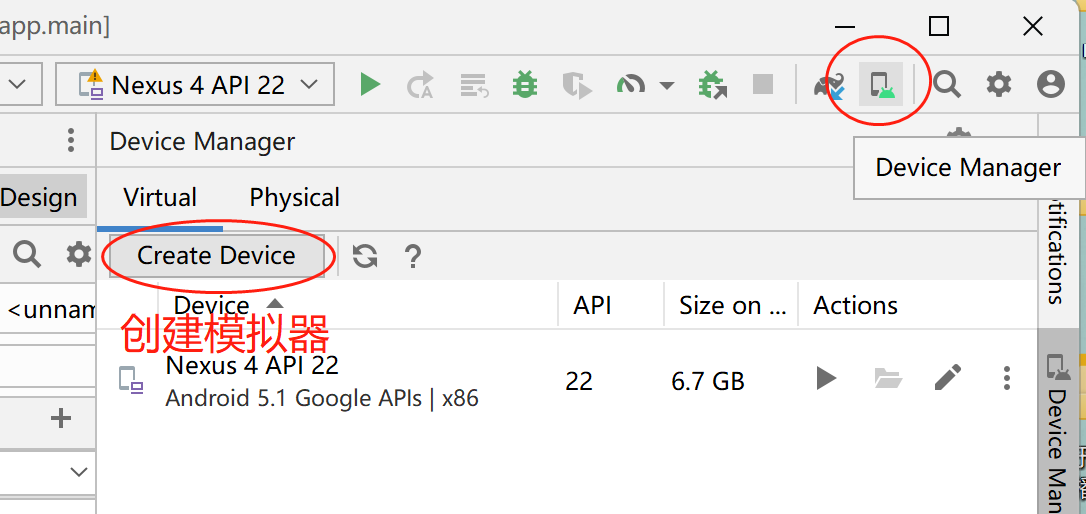
由于我们是在PC端编写安卓的apk 所以需要使用手机模拟器进行调试
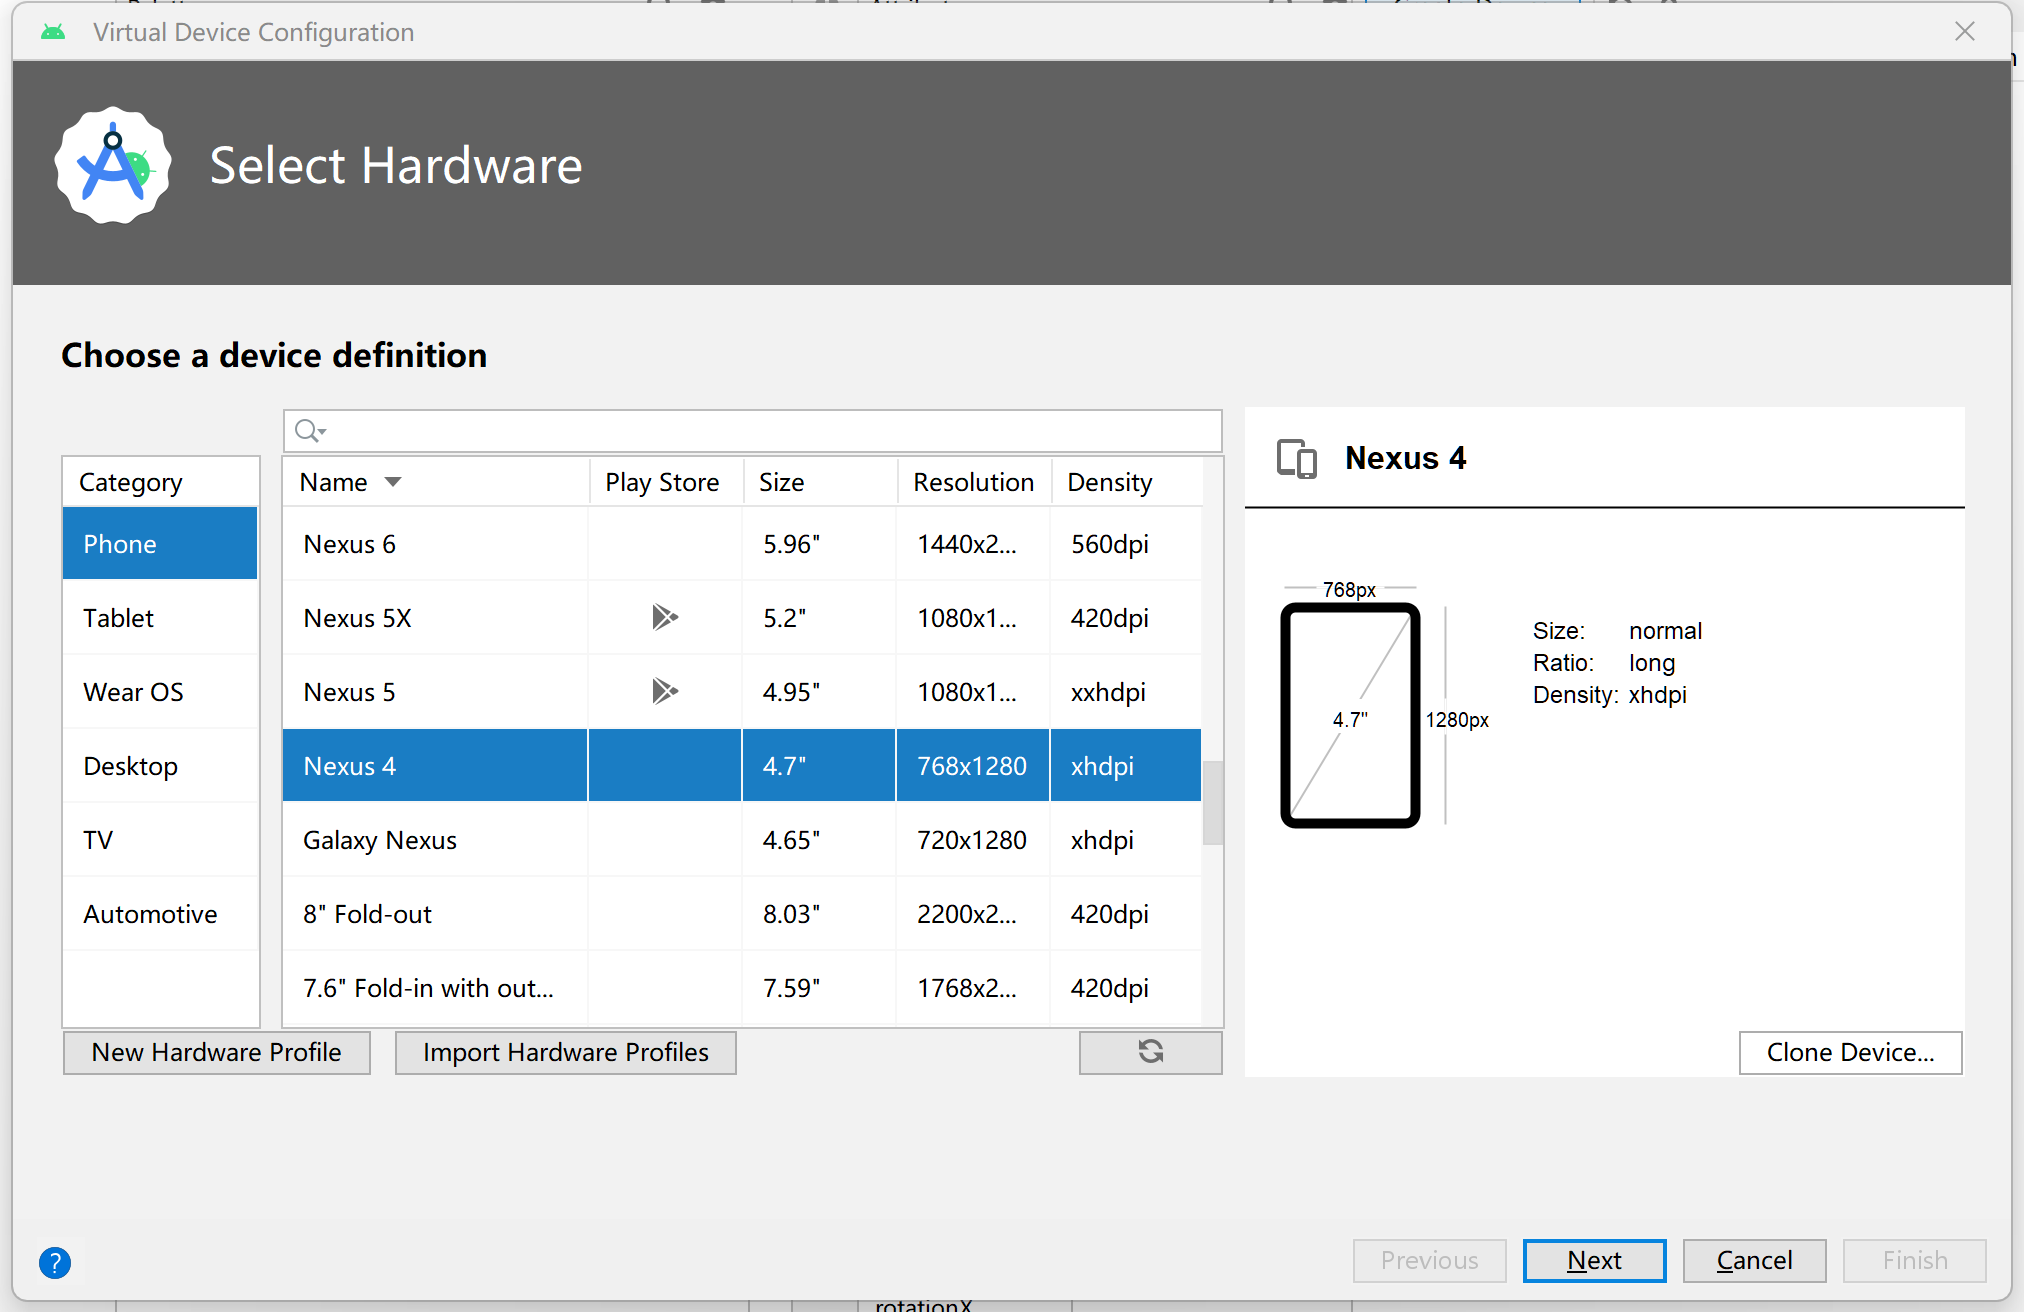
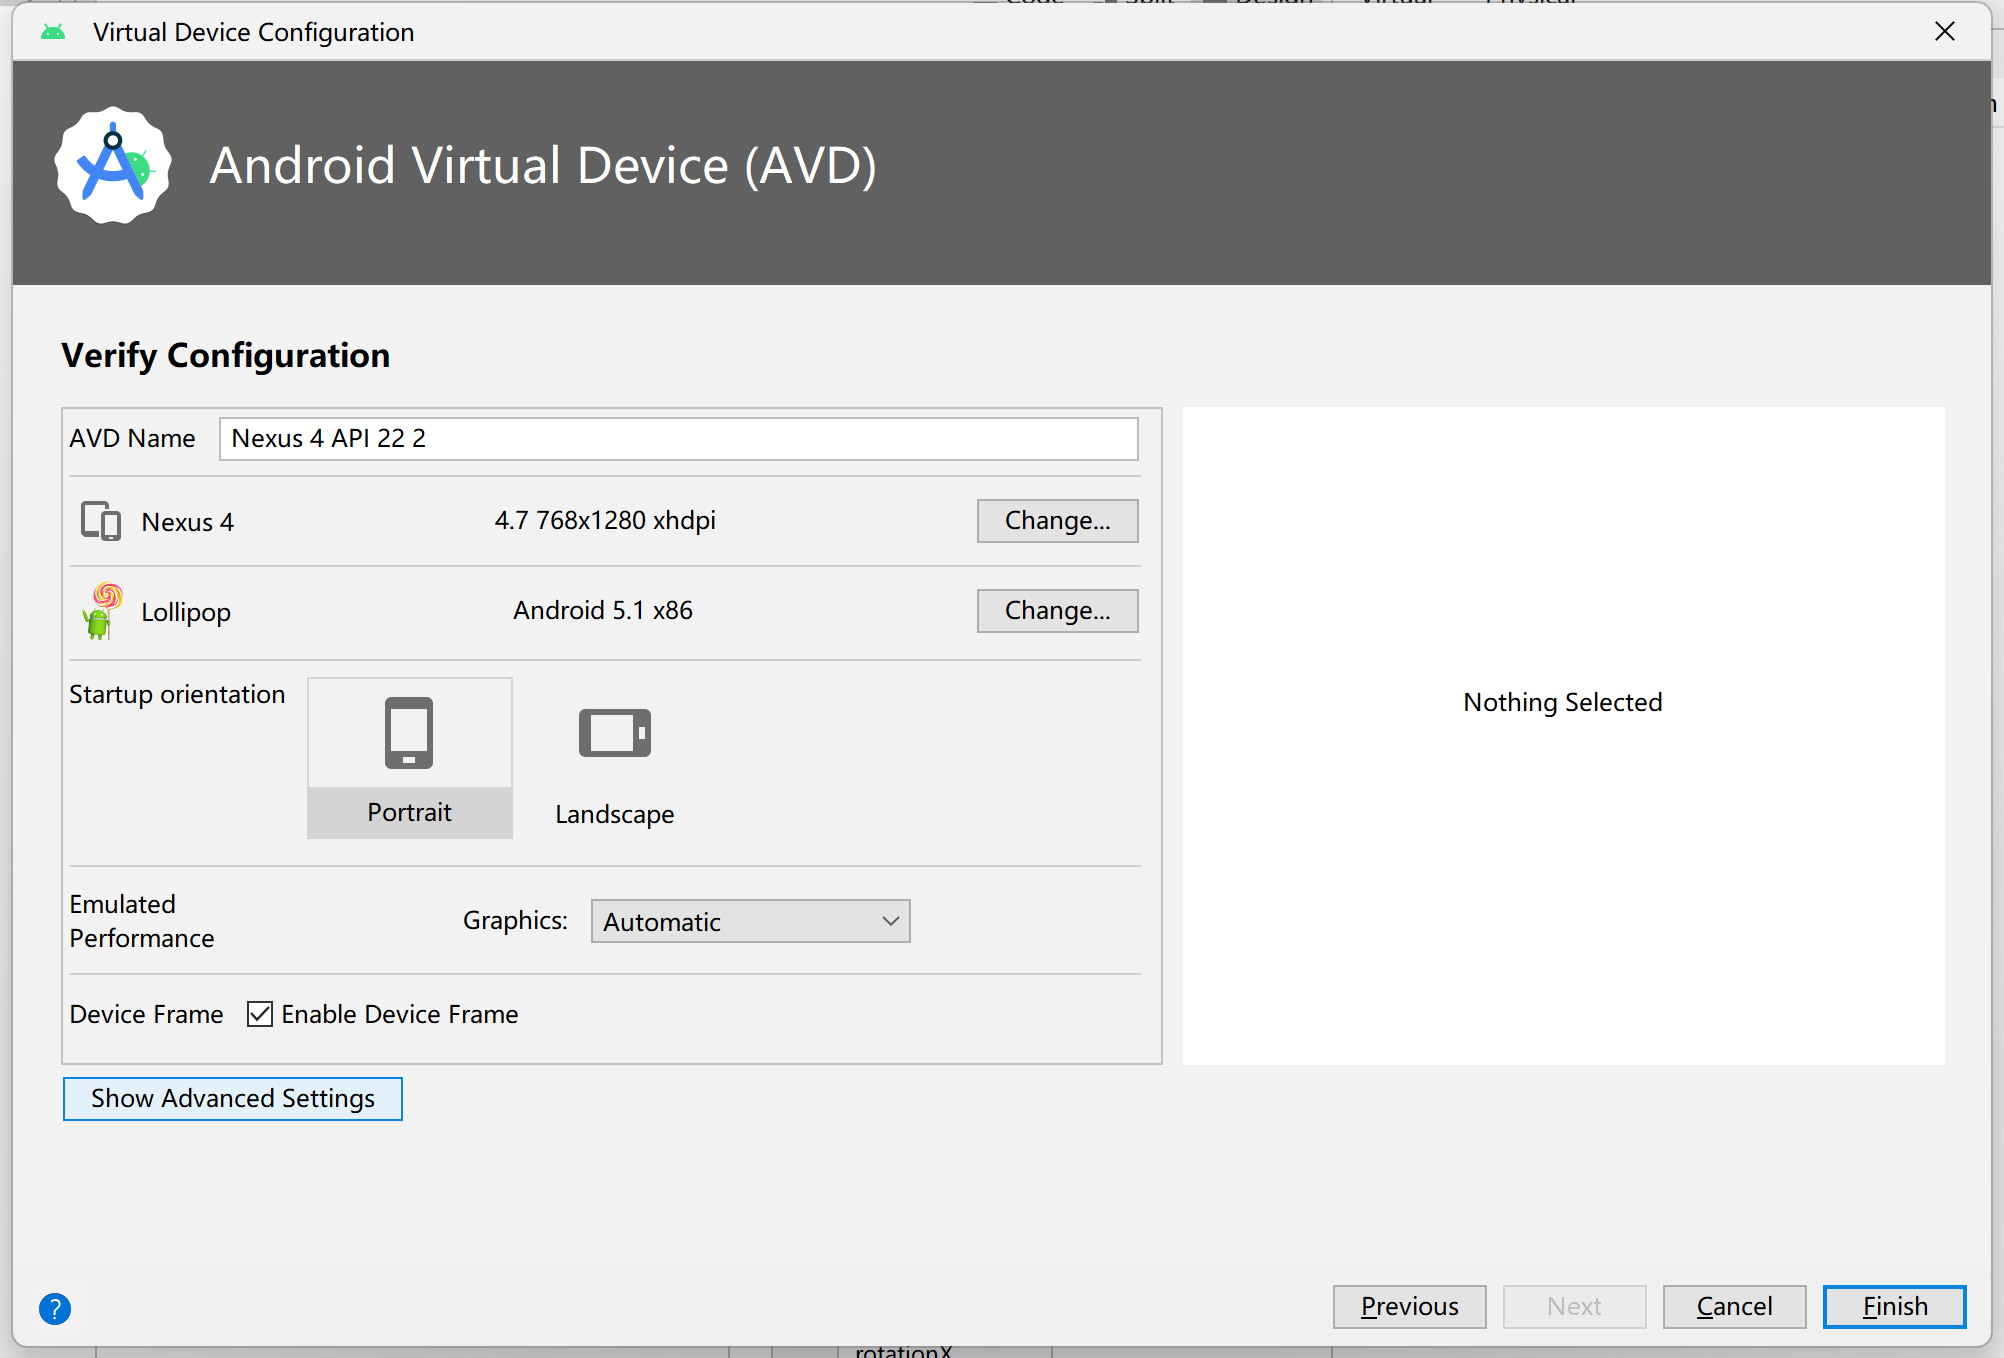
选择手机型号
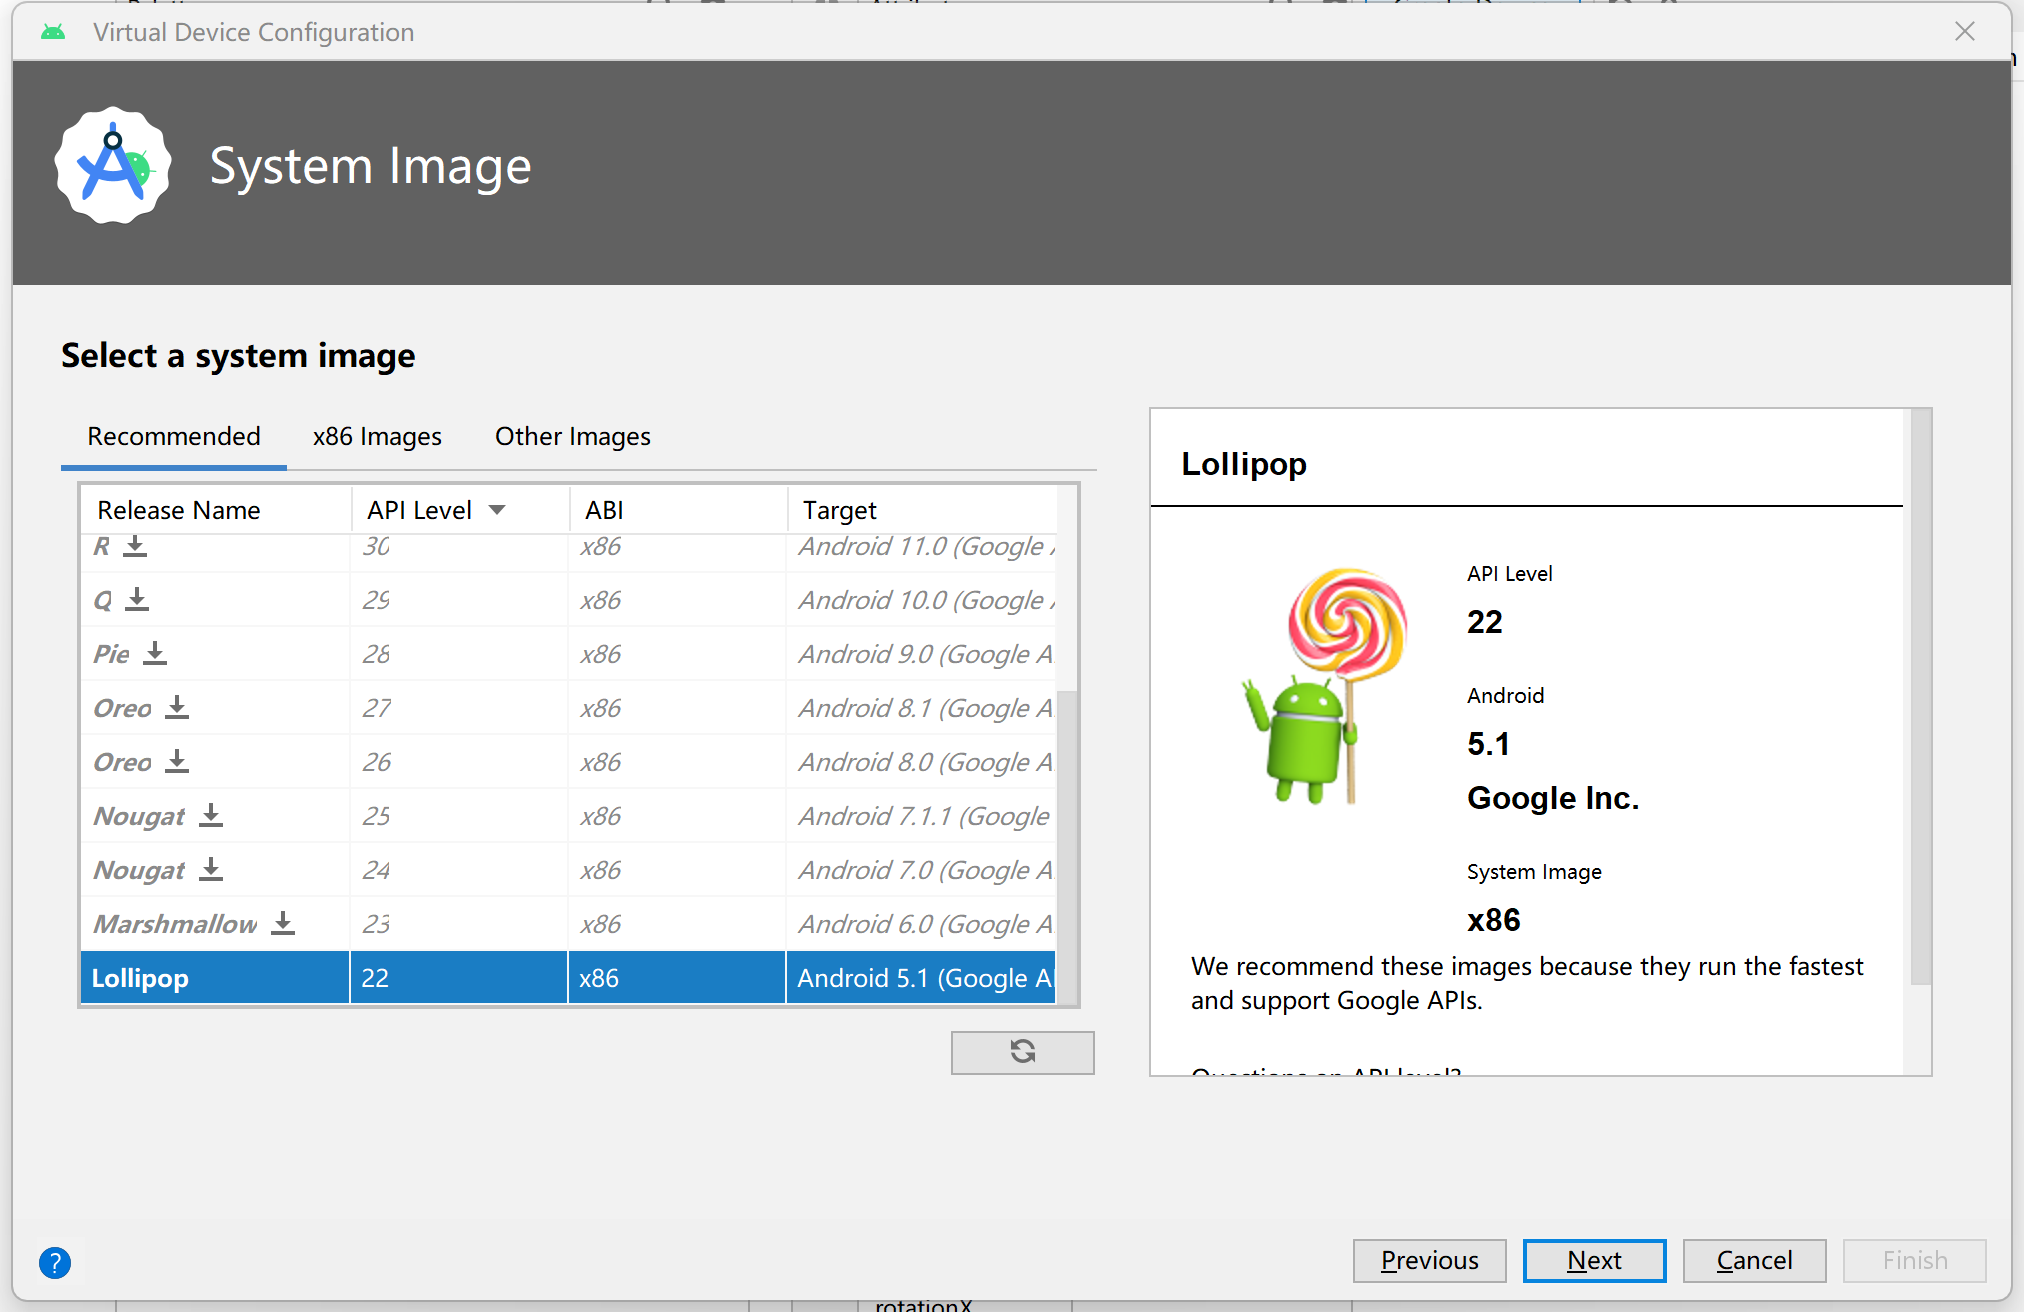
选择手机系统
命名
点击finish等待安装创建完成
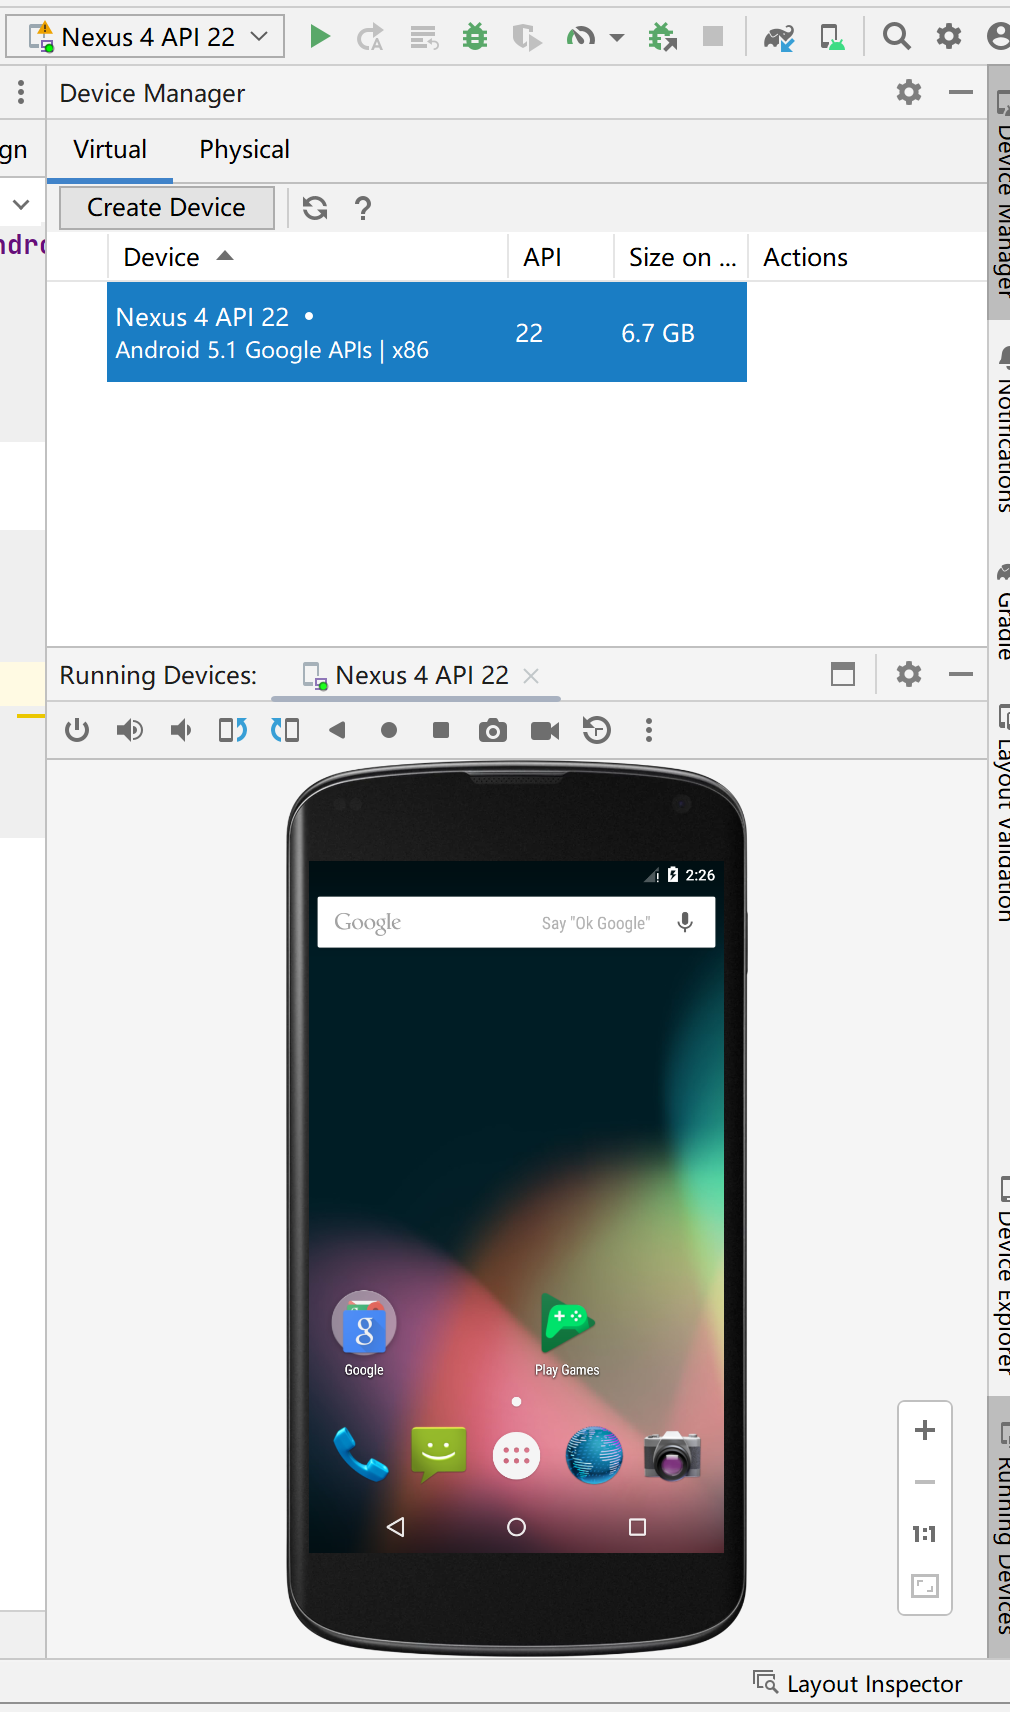
启动模拟器即可看到我们的手机界面
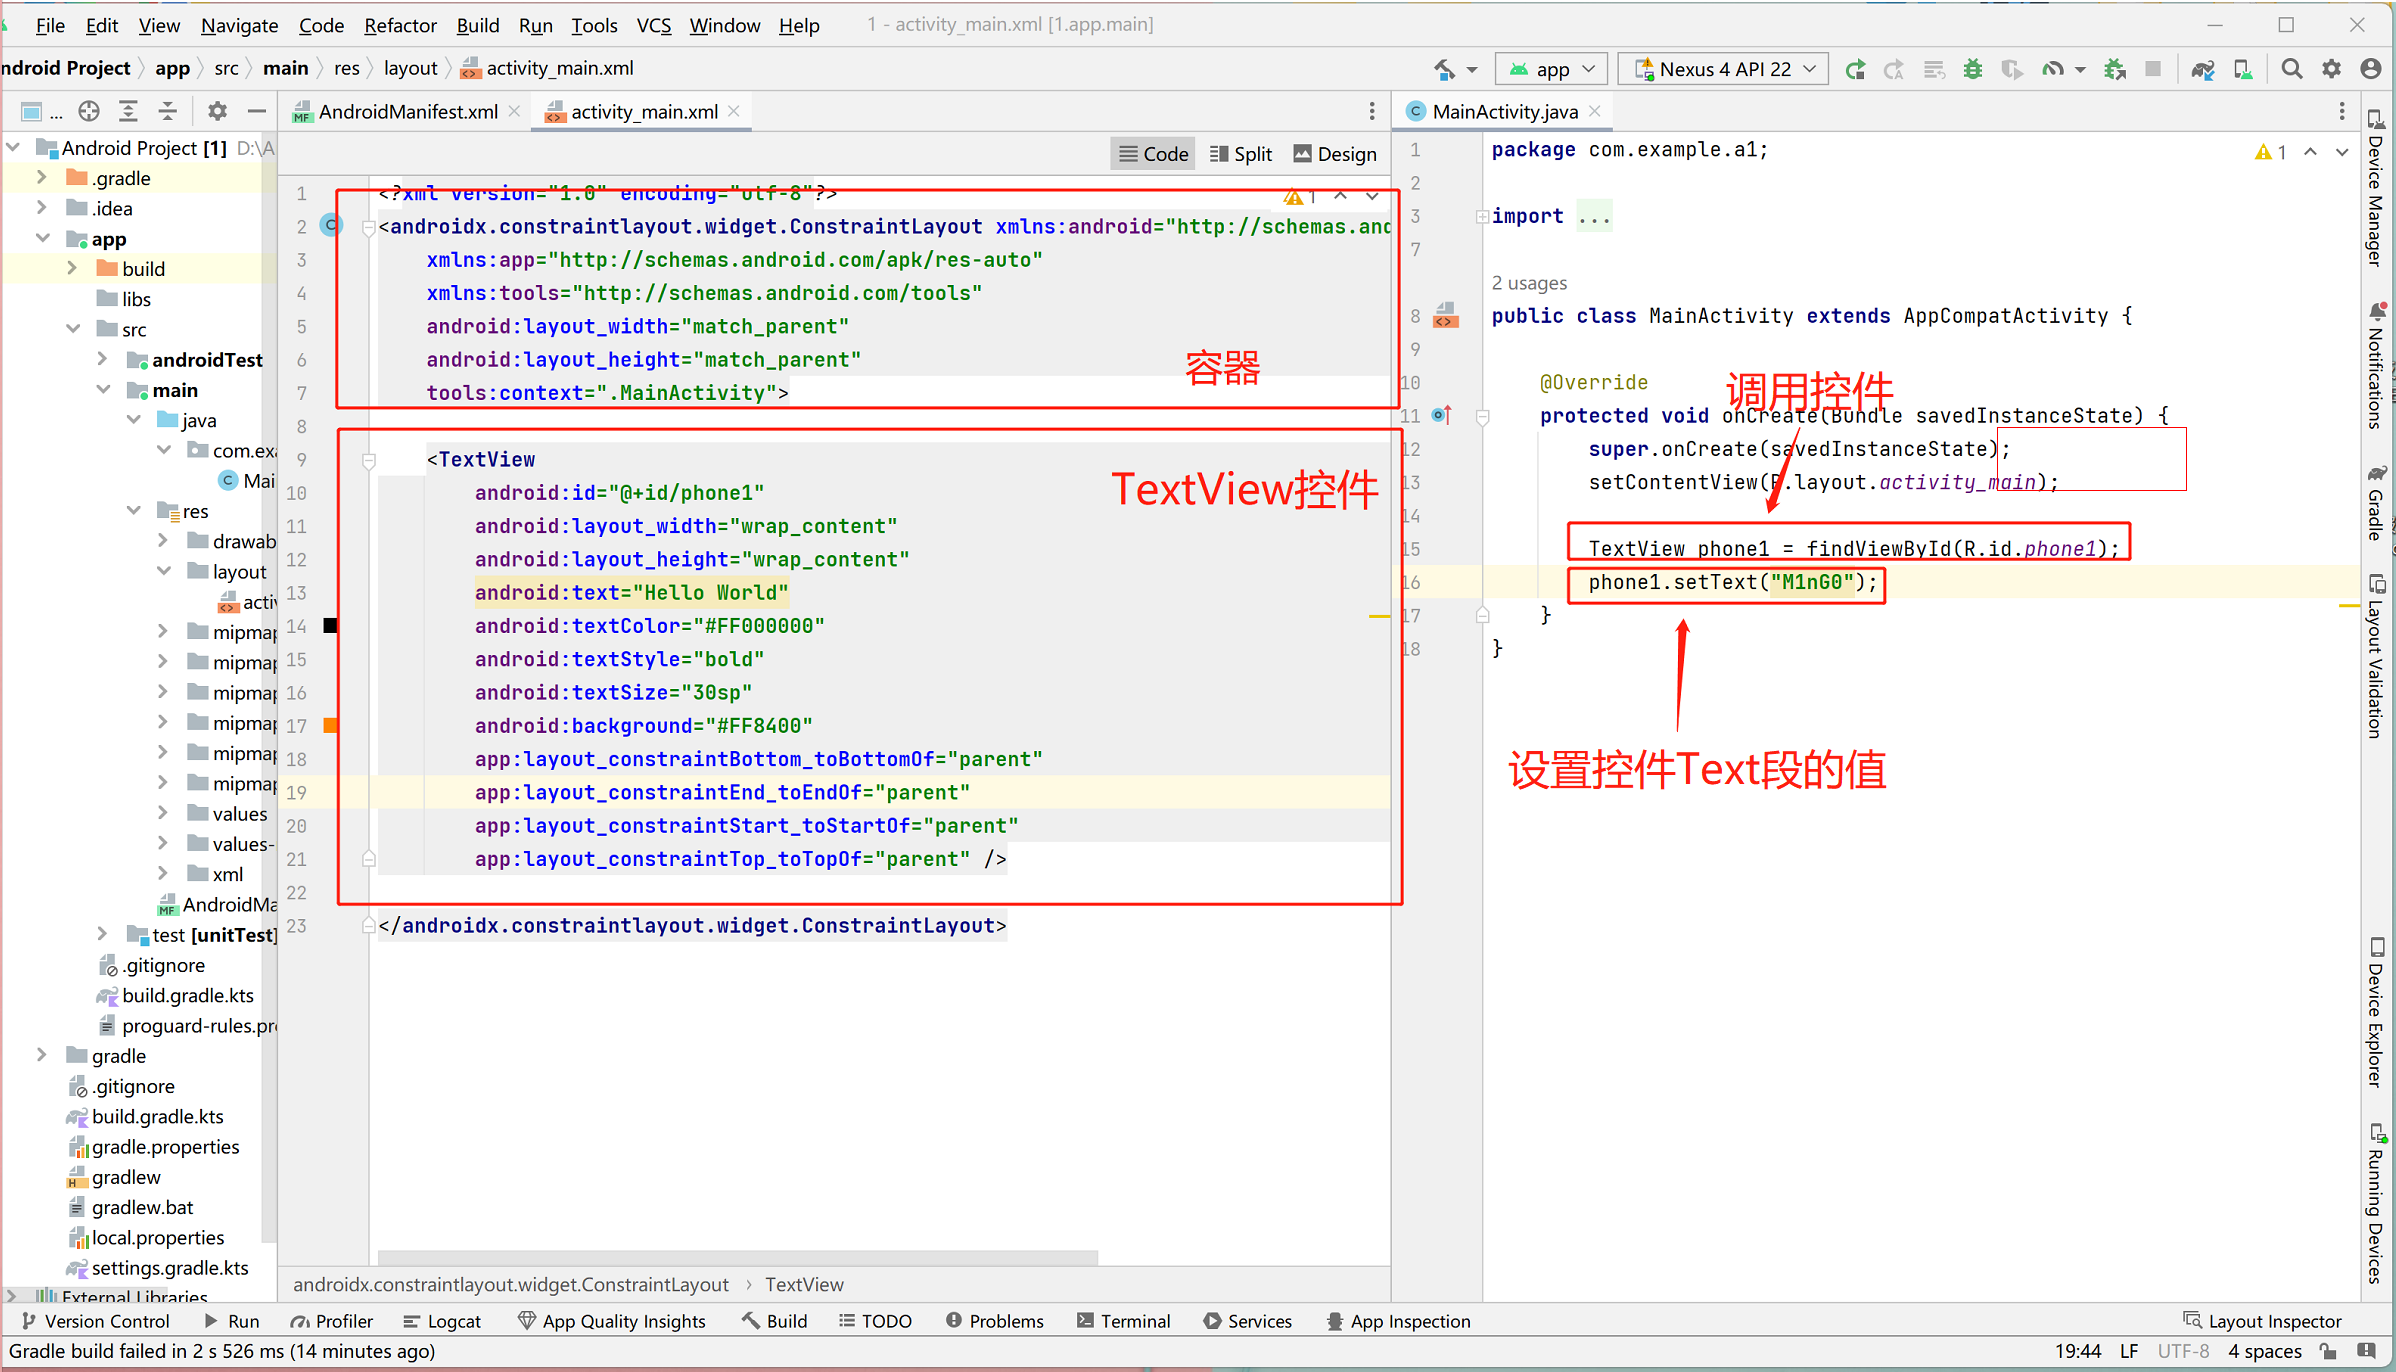
好 接下来我们回过头分析主函数MainAcvitity.java
1
2
3
4
5
6
7
8
9
10
11
12
13
14
package com.example.a1;import androidx.appcompat.app.AppCompatActivity;import android.os.Bundle;public class MainActivity extends AppCompatActivity { @Override protected void onCreate (Bundle savedInstanceState) { super .onCreate(savedInstanceState); setContentView(R.layout.activity_main); } }
这段代码是一个Android应用程序的主活动(MainActivity),继承自AppCompatActivity类。在Android中,活动是应用程序的一个基本组件,用于用户界面的展示和用户交互。
在MainActivity类中,有一个重写的onCreate()方法。这个方法是活动创建时自动调用的,用于初始化活动的状态和界面。在这个方法中,首先调用了父类的onCreate()方法,确保父类的初始化工作得以完成。然后通过调用setContentView()方法,将布局文件activity_main.xml与当前活动的界面进行关联。
这段代码的作用是在应用程序启动时,创建MainActivity活动并将activity_main.xml布局文件与该活动的界面进行关联。
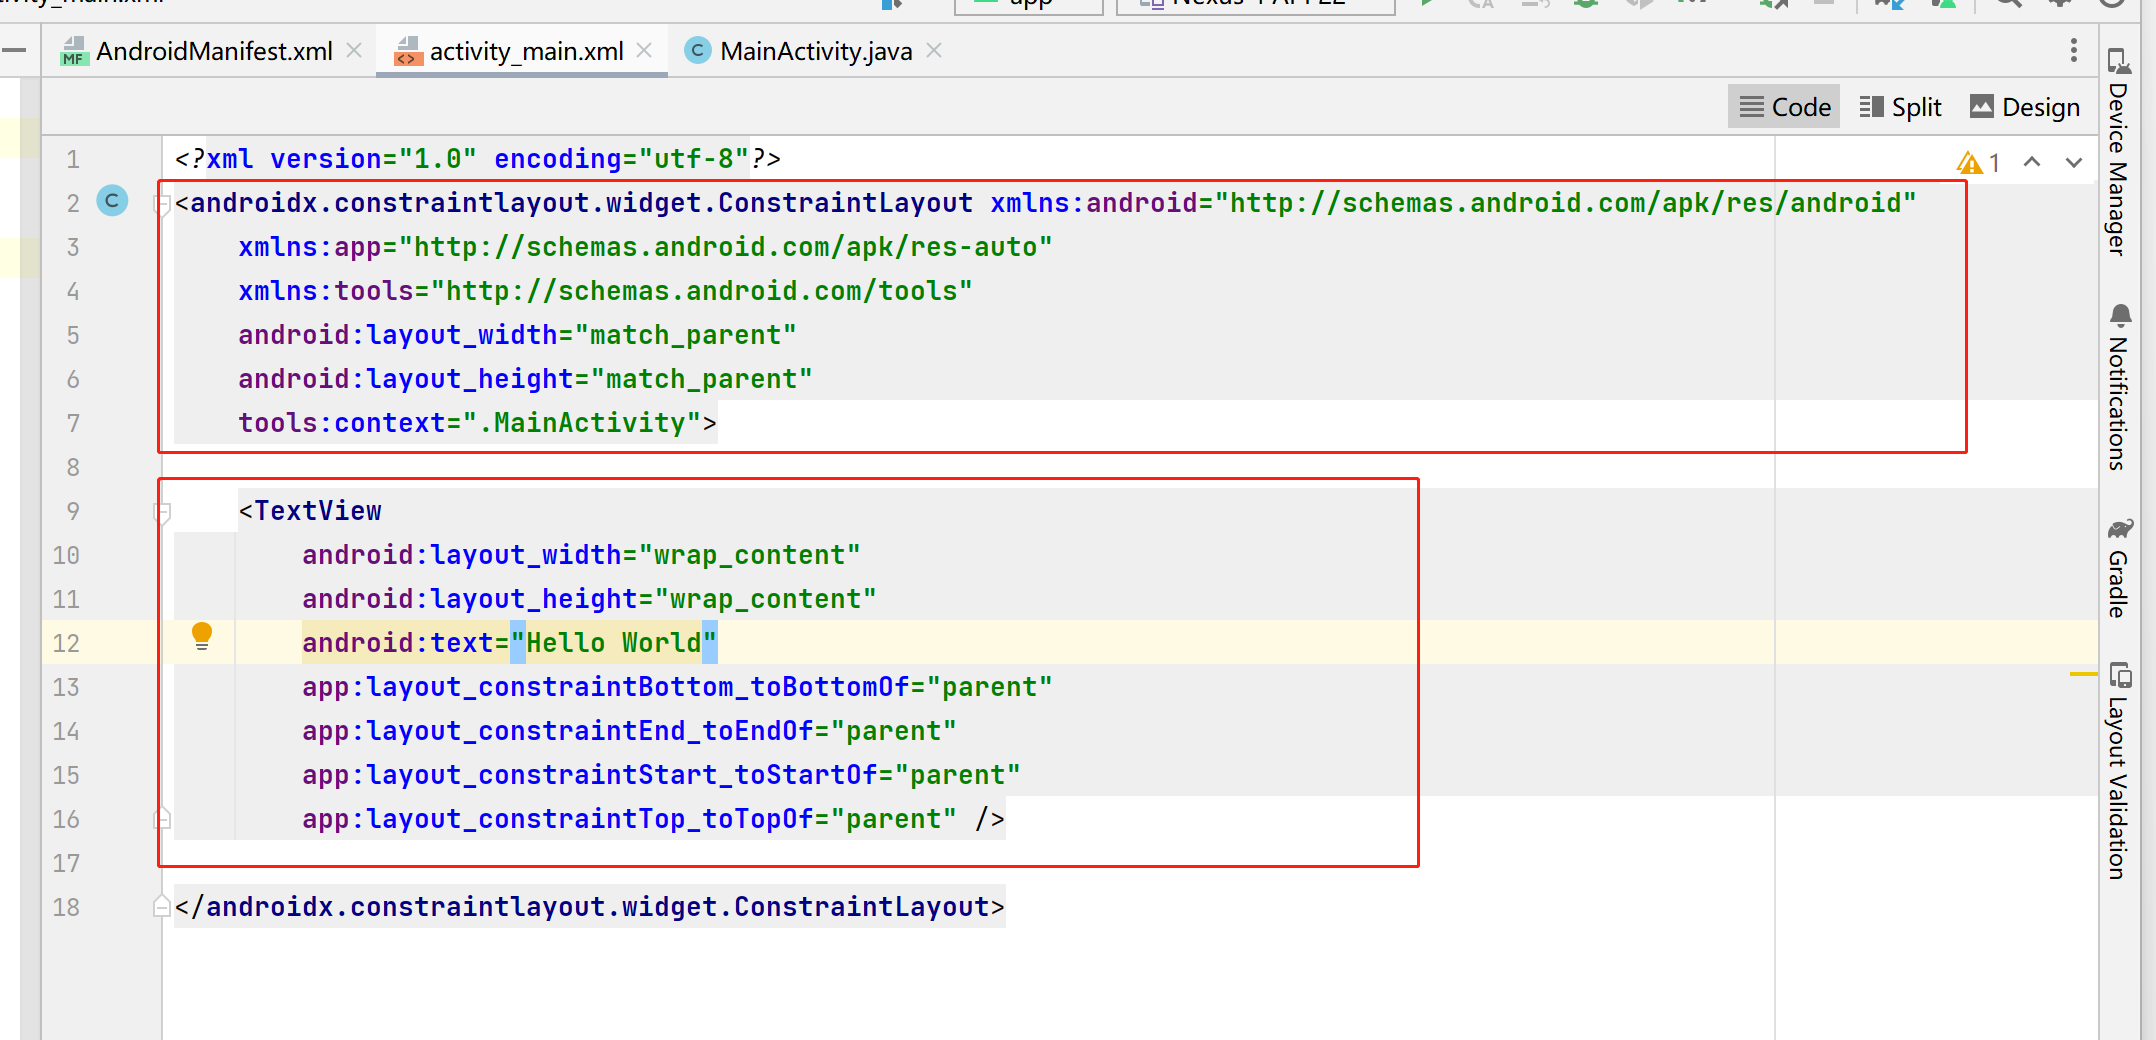
然后分析activity_main.xml布局文件:
1
2
3
4
5
6
7
8
9
10
11
12
13
14
15
16
17
18
<?xml version="1.0" encoding="utf-8" ?> <androidx.constraintlayout.widget.ConstraintLayout xmlns:android ="http://schemas.android.com/apk/res/android" xmlns:app ="http://schemas.android.com/apk/res-auto" xmlns:tools ="http://schemas.android.com/tools" android:layout_width ="match_parent" android:layout_height ="match_parent" tools:context =".MainActivity" > <TextView android:layout_width ="wrap_content" android:layout_height ="wrap_content" android:text ="Hello World" app:layout_constraintBottom_toBottomOf ="parent" app:layout_constraintEnd_toEndOf ="parent" app:layout_constraintStart_toStartOf ="parent" app:layout_constraintTop_toTopOf ="parent" /> </androidx.constraintlayout.widget.ConstraintLayout >
在布局文件中,使用了ConstraintLayout作为根布局,它是一种用于约束和组织UI元素的布局容器。通过使用约束(constraints),可以指定视图相对于父容器或其他视图的位置关系。
布局文件中包含了一个TextView元素,用于显示文本内容。
TextView元素的属性如下:
android:layout_width和android:layout_height属性指定了TextView的宽度和高度都是包裹内容(wrap_content)。
android:text属性指定了TextView显示的文本内容为”Hello World”。
app:layout_constraintBottom_toBottomOf、app:layout_constraintEnd_toEndOf、app:layout_constraintStart_toStartOf和app:layout_constraintTop_toTopOf指定了TextView与父容器的约束关系,即四个方向都与父容器进行约束,使得TextView居中显示在父容器中心。
总结,这段布局文件的作用是创建一个包含一个TextView的界面布局,在MainActivity中使用setContentView()方法将该布局与活动的界面进行关联。该布局使得TextView居中显示,并显示文本内容为”Hello World”。
测试一下看看
成功显示HelloWorld
Android基础开发–控件 基础控件 TextView 显示文字,相当于Panel
按用途分类:
文本控件
日期与时间选择控件
TextView 1 2 3 4 5 6 7 8 9 10 11 12 13 <TextView android:id ="@+id/phone1" // 设置控件ID 方便调用 android:layout_width ="wrap_content" // 宽 与内容长度相同 android:layout_height ="wrap_content" // 高 与内容长度相同 android:background ="@color/black" // 文本背景颜色 android:text ="Hello World" // 文本内容 android:textColor ="#FF000000" // 字体颜色 android:textSize ="30sp" // 字体大小 android:textStyle ="bold" // 字体样式 加粗 app:layout_constraintBottom_toBottomOf ="parent" // 文本位置与页面上下左右距离 app:layout_constraintEnd_toEndOf ="parent" app:layout_constraintStart_toStartOf ="parent" app:layout_constraintTop_toTopOf ="parent" />
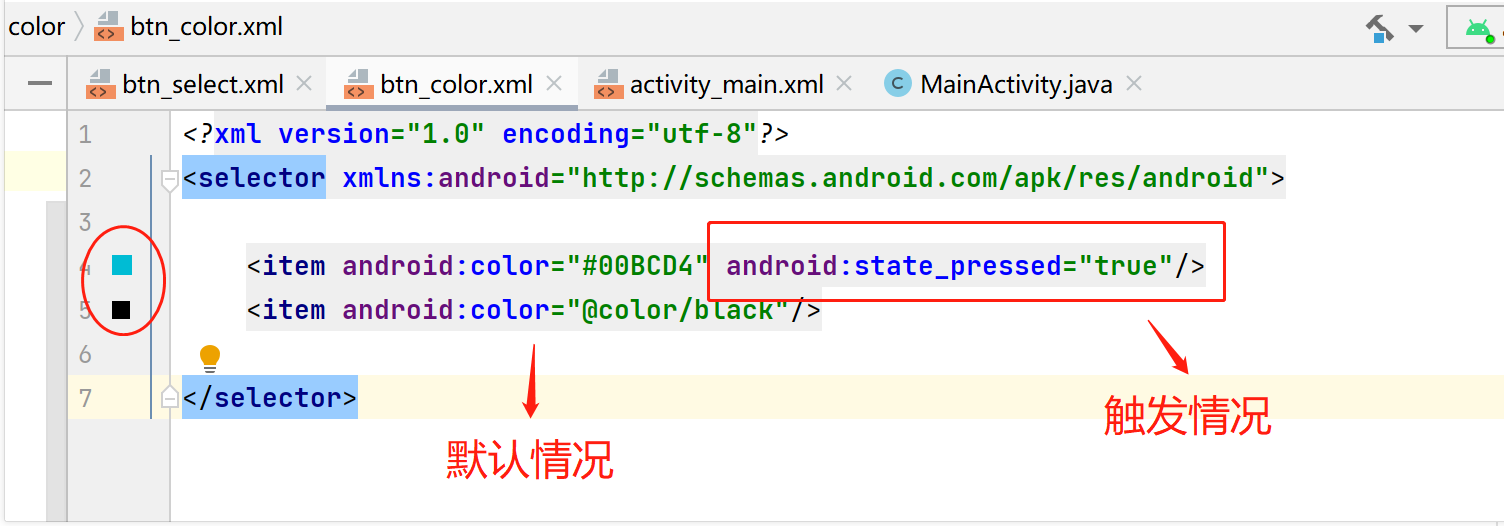
1 2 3 4 5 6 7 8 9 10 11 12 13 14 15 16 <Button //按钮控件 android:id ="@+id/btn" //设置控件ID 为btn android:layout_width ="108dp" // 设置控件位置 android:layout_height ="57dp" android:layout_marginStart ="150dp" android:layout_marginEnd ="150dp" android:layout_marginBottom ="100dp" android:background ="@drawable/btn_select" // 设置背景图片 调用图片选择文件 android:backgroundTint ="@color/btn_color" // 背景颜色选择 调用颜色选择文件 android:rotationX ="0" android:text ="" // 显示文本 app:layout_constraintBottom_toBottomOf ="parent" app:layout_constraintEnd_toEndOf ="parent" app:layout_constraintStart_toStartOf ="parent" tools:ignore ="MissingConstraints" android:onClick ="S3C" //点击事件 />
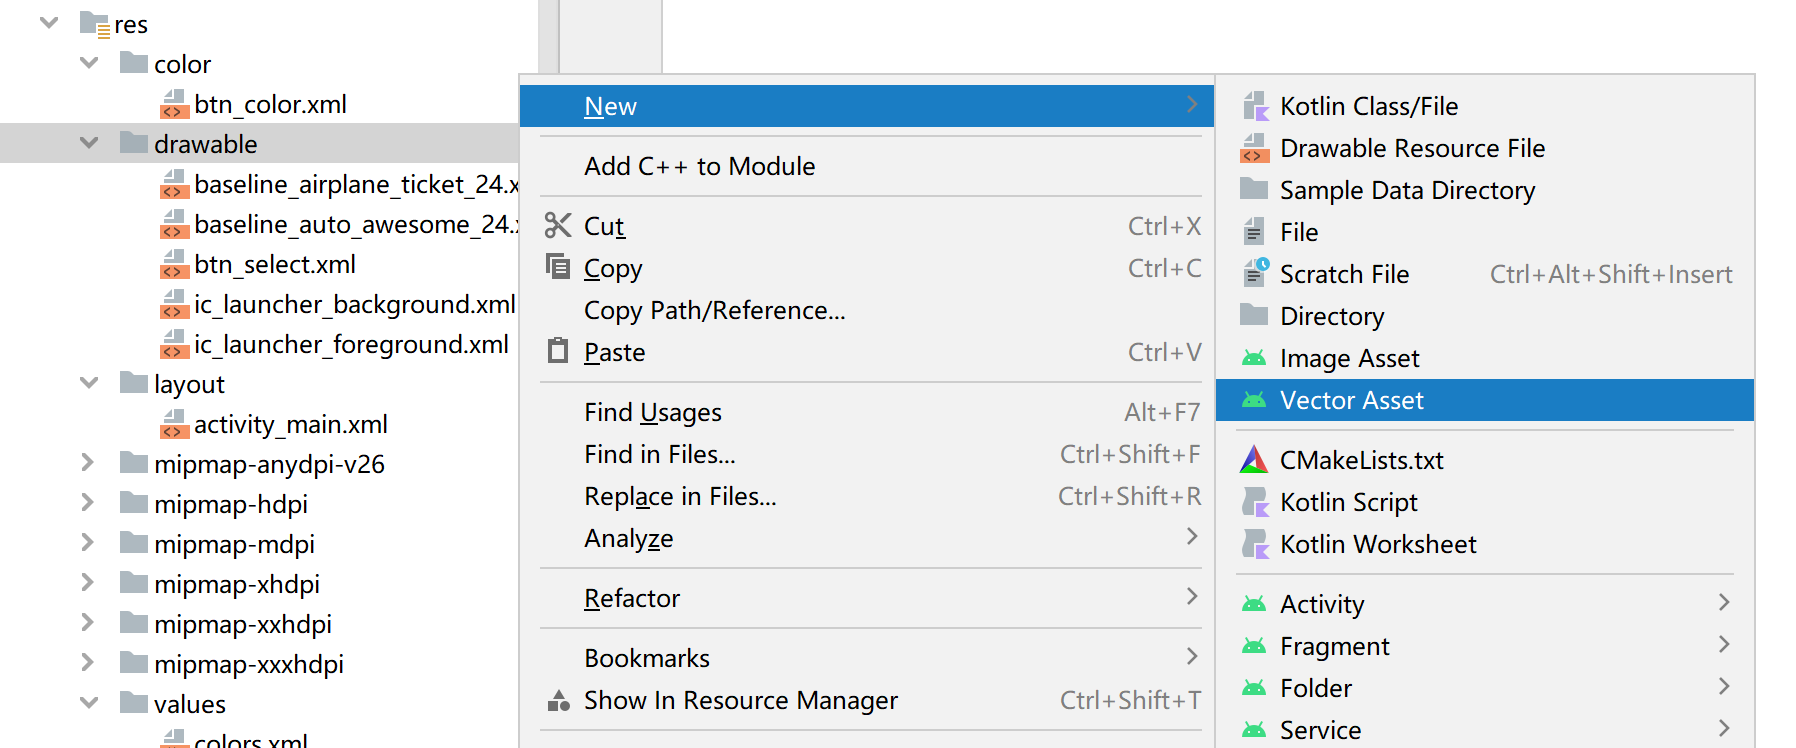
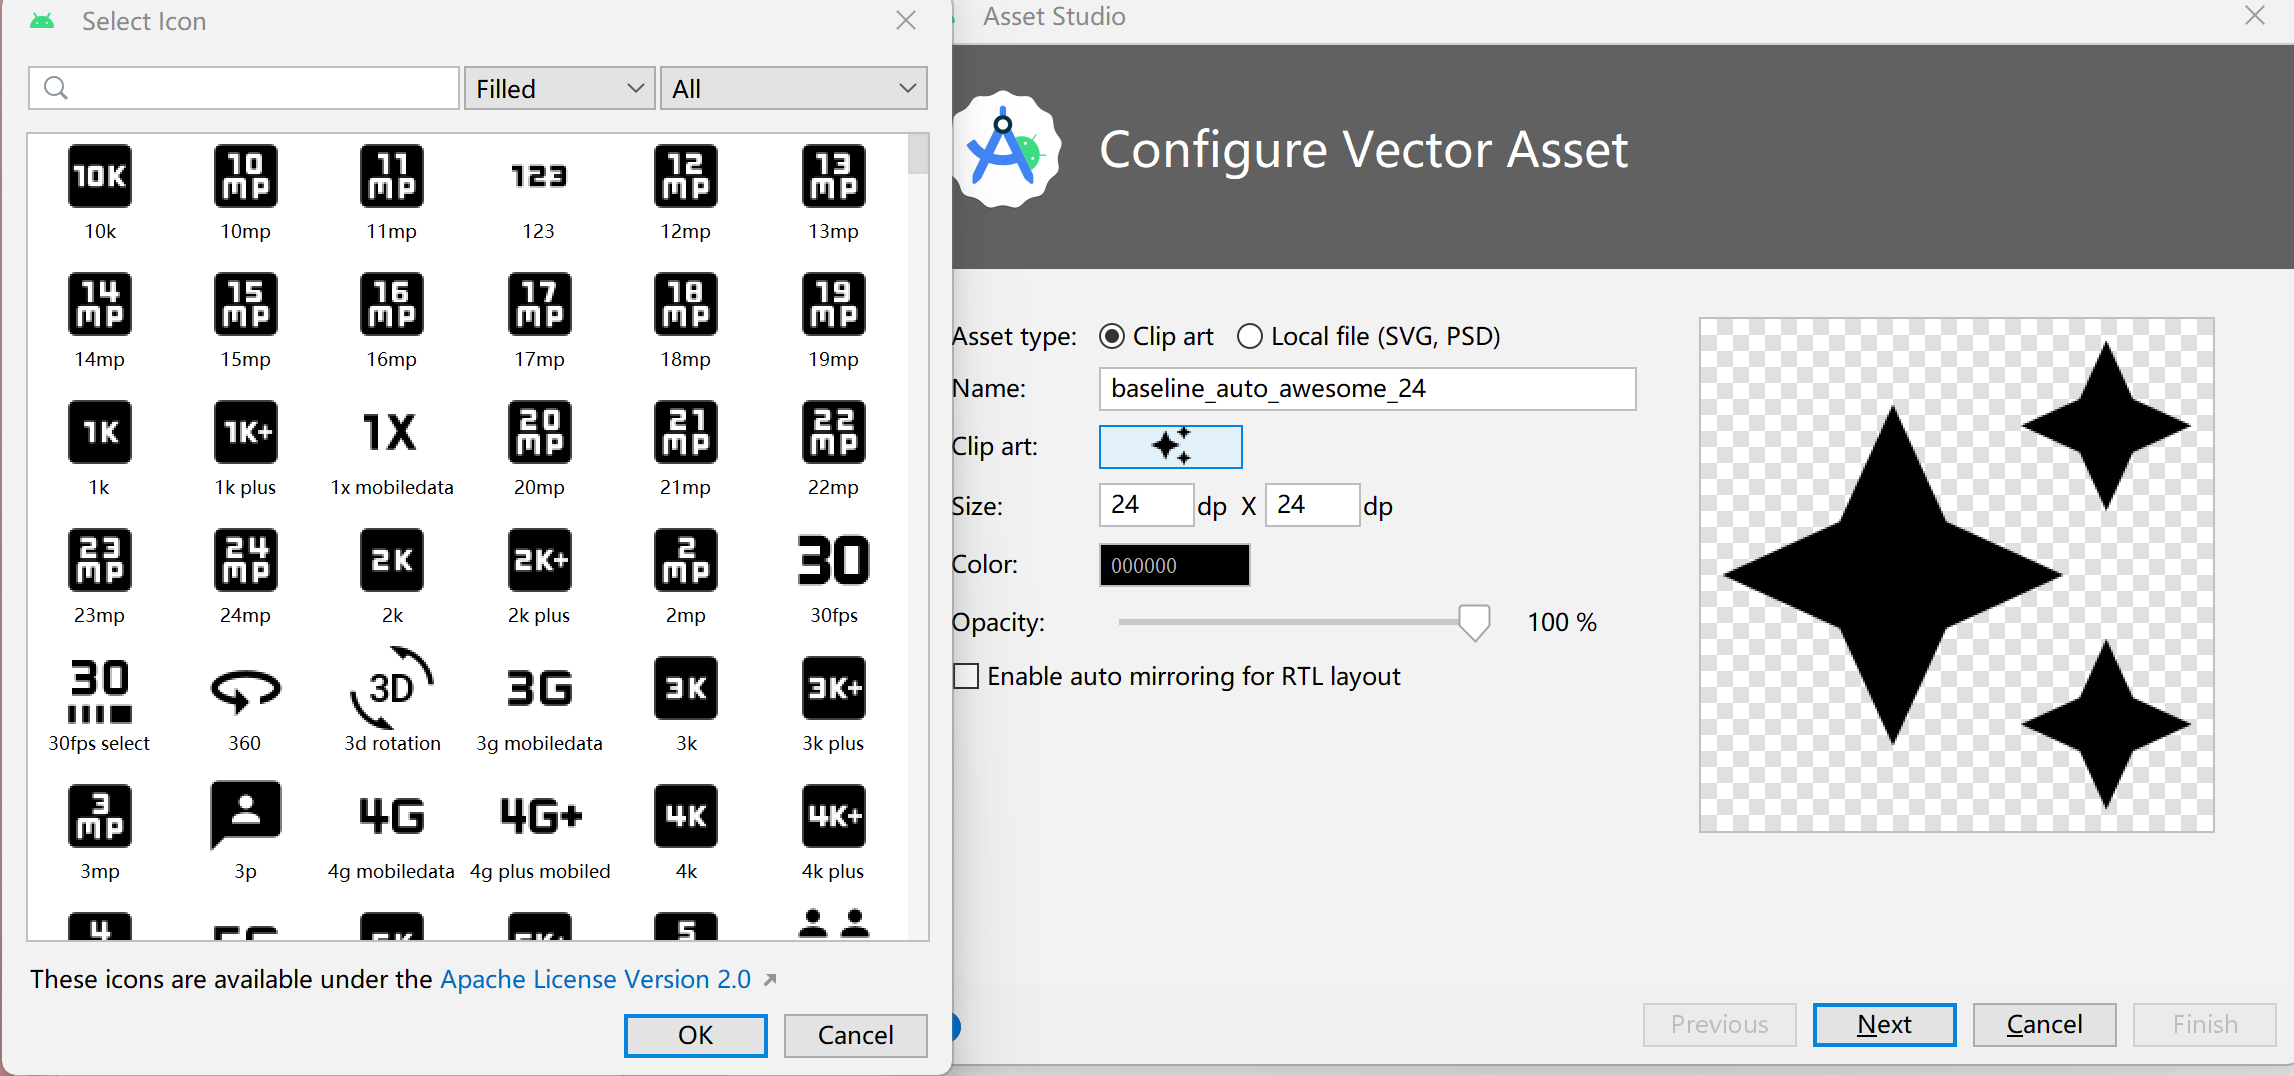
下载图标
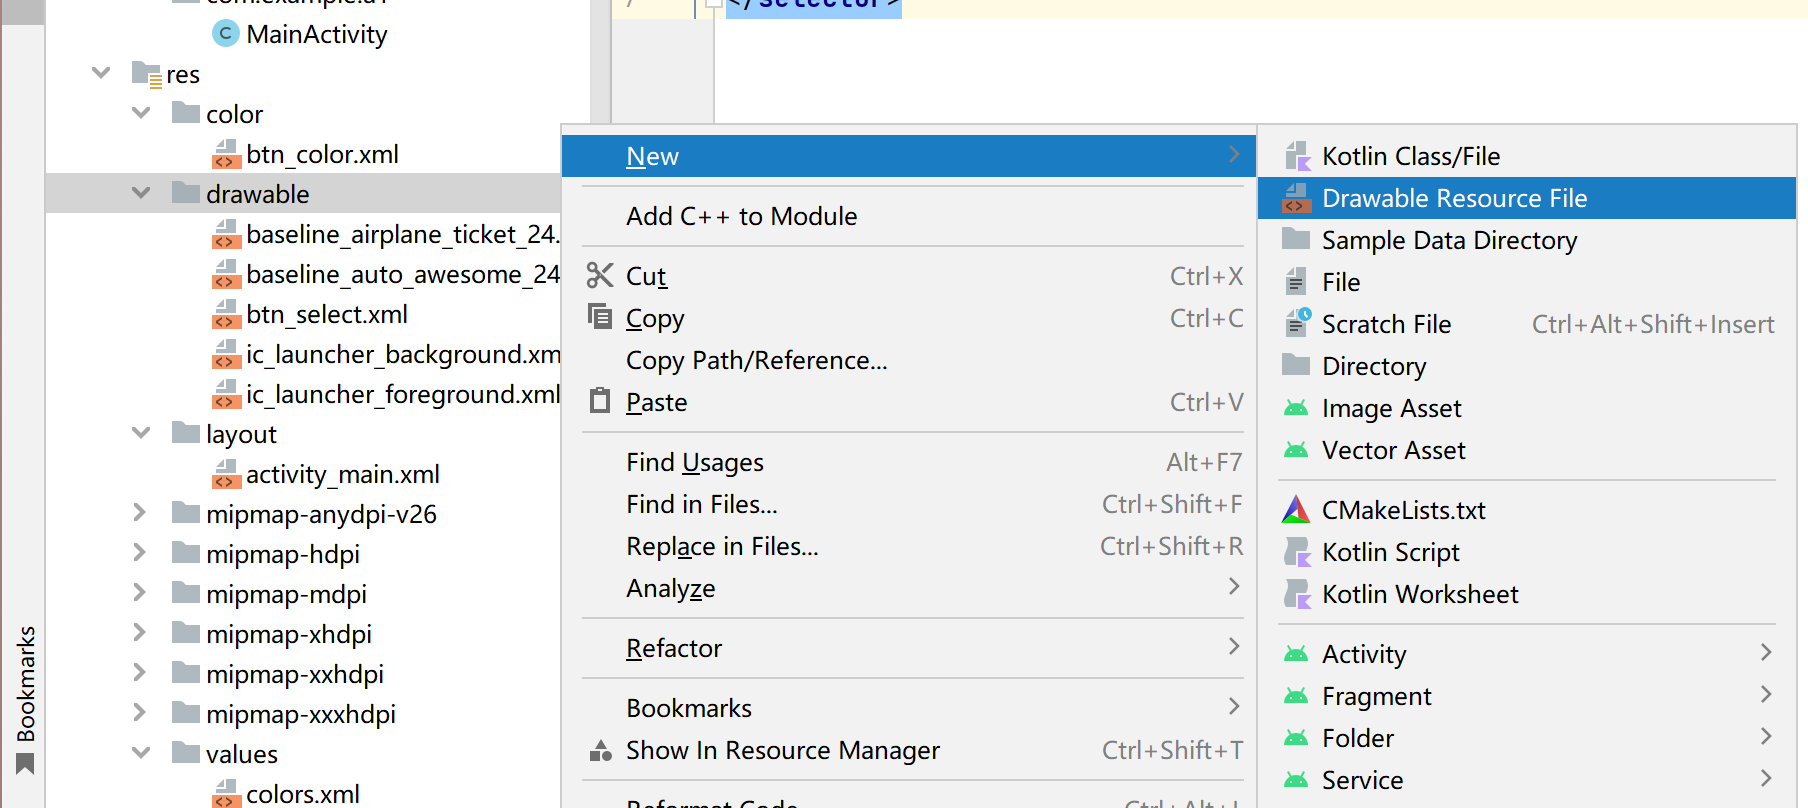
建立背景图片选择文件并编辑
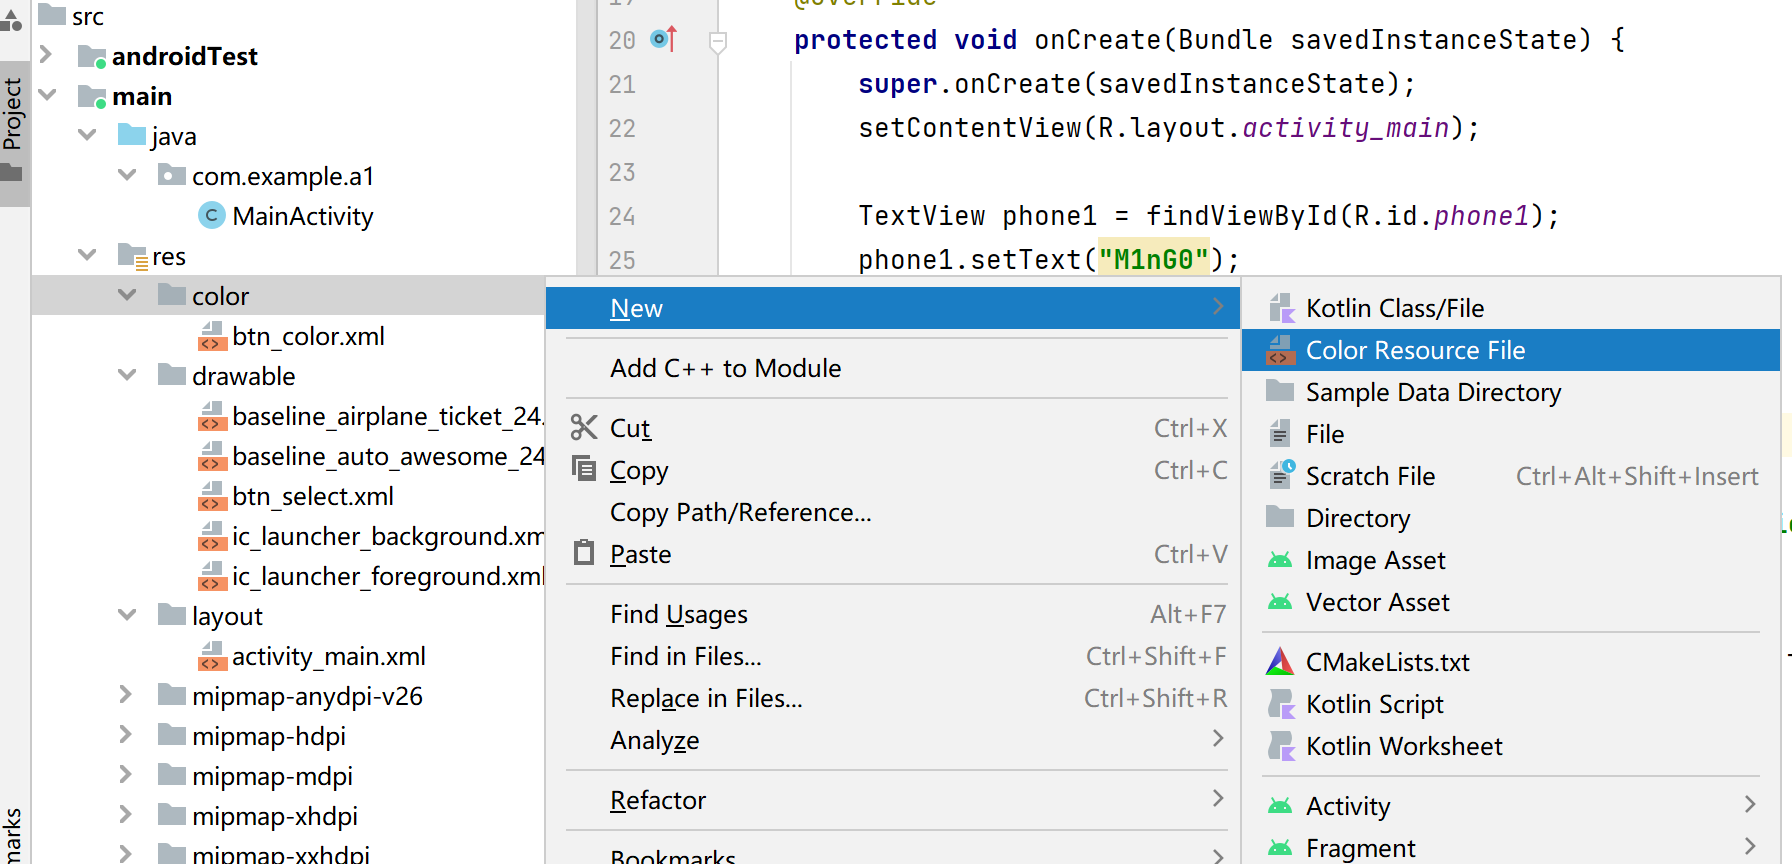
建立颜色选择文件并编辑
Main函数
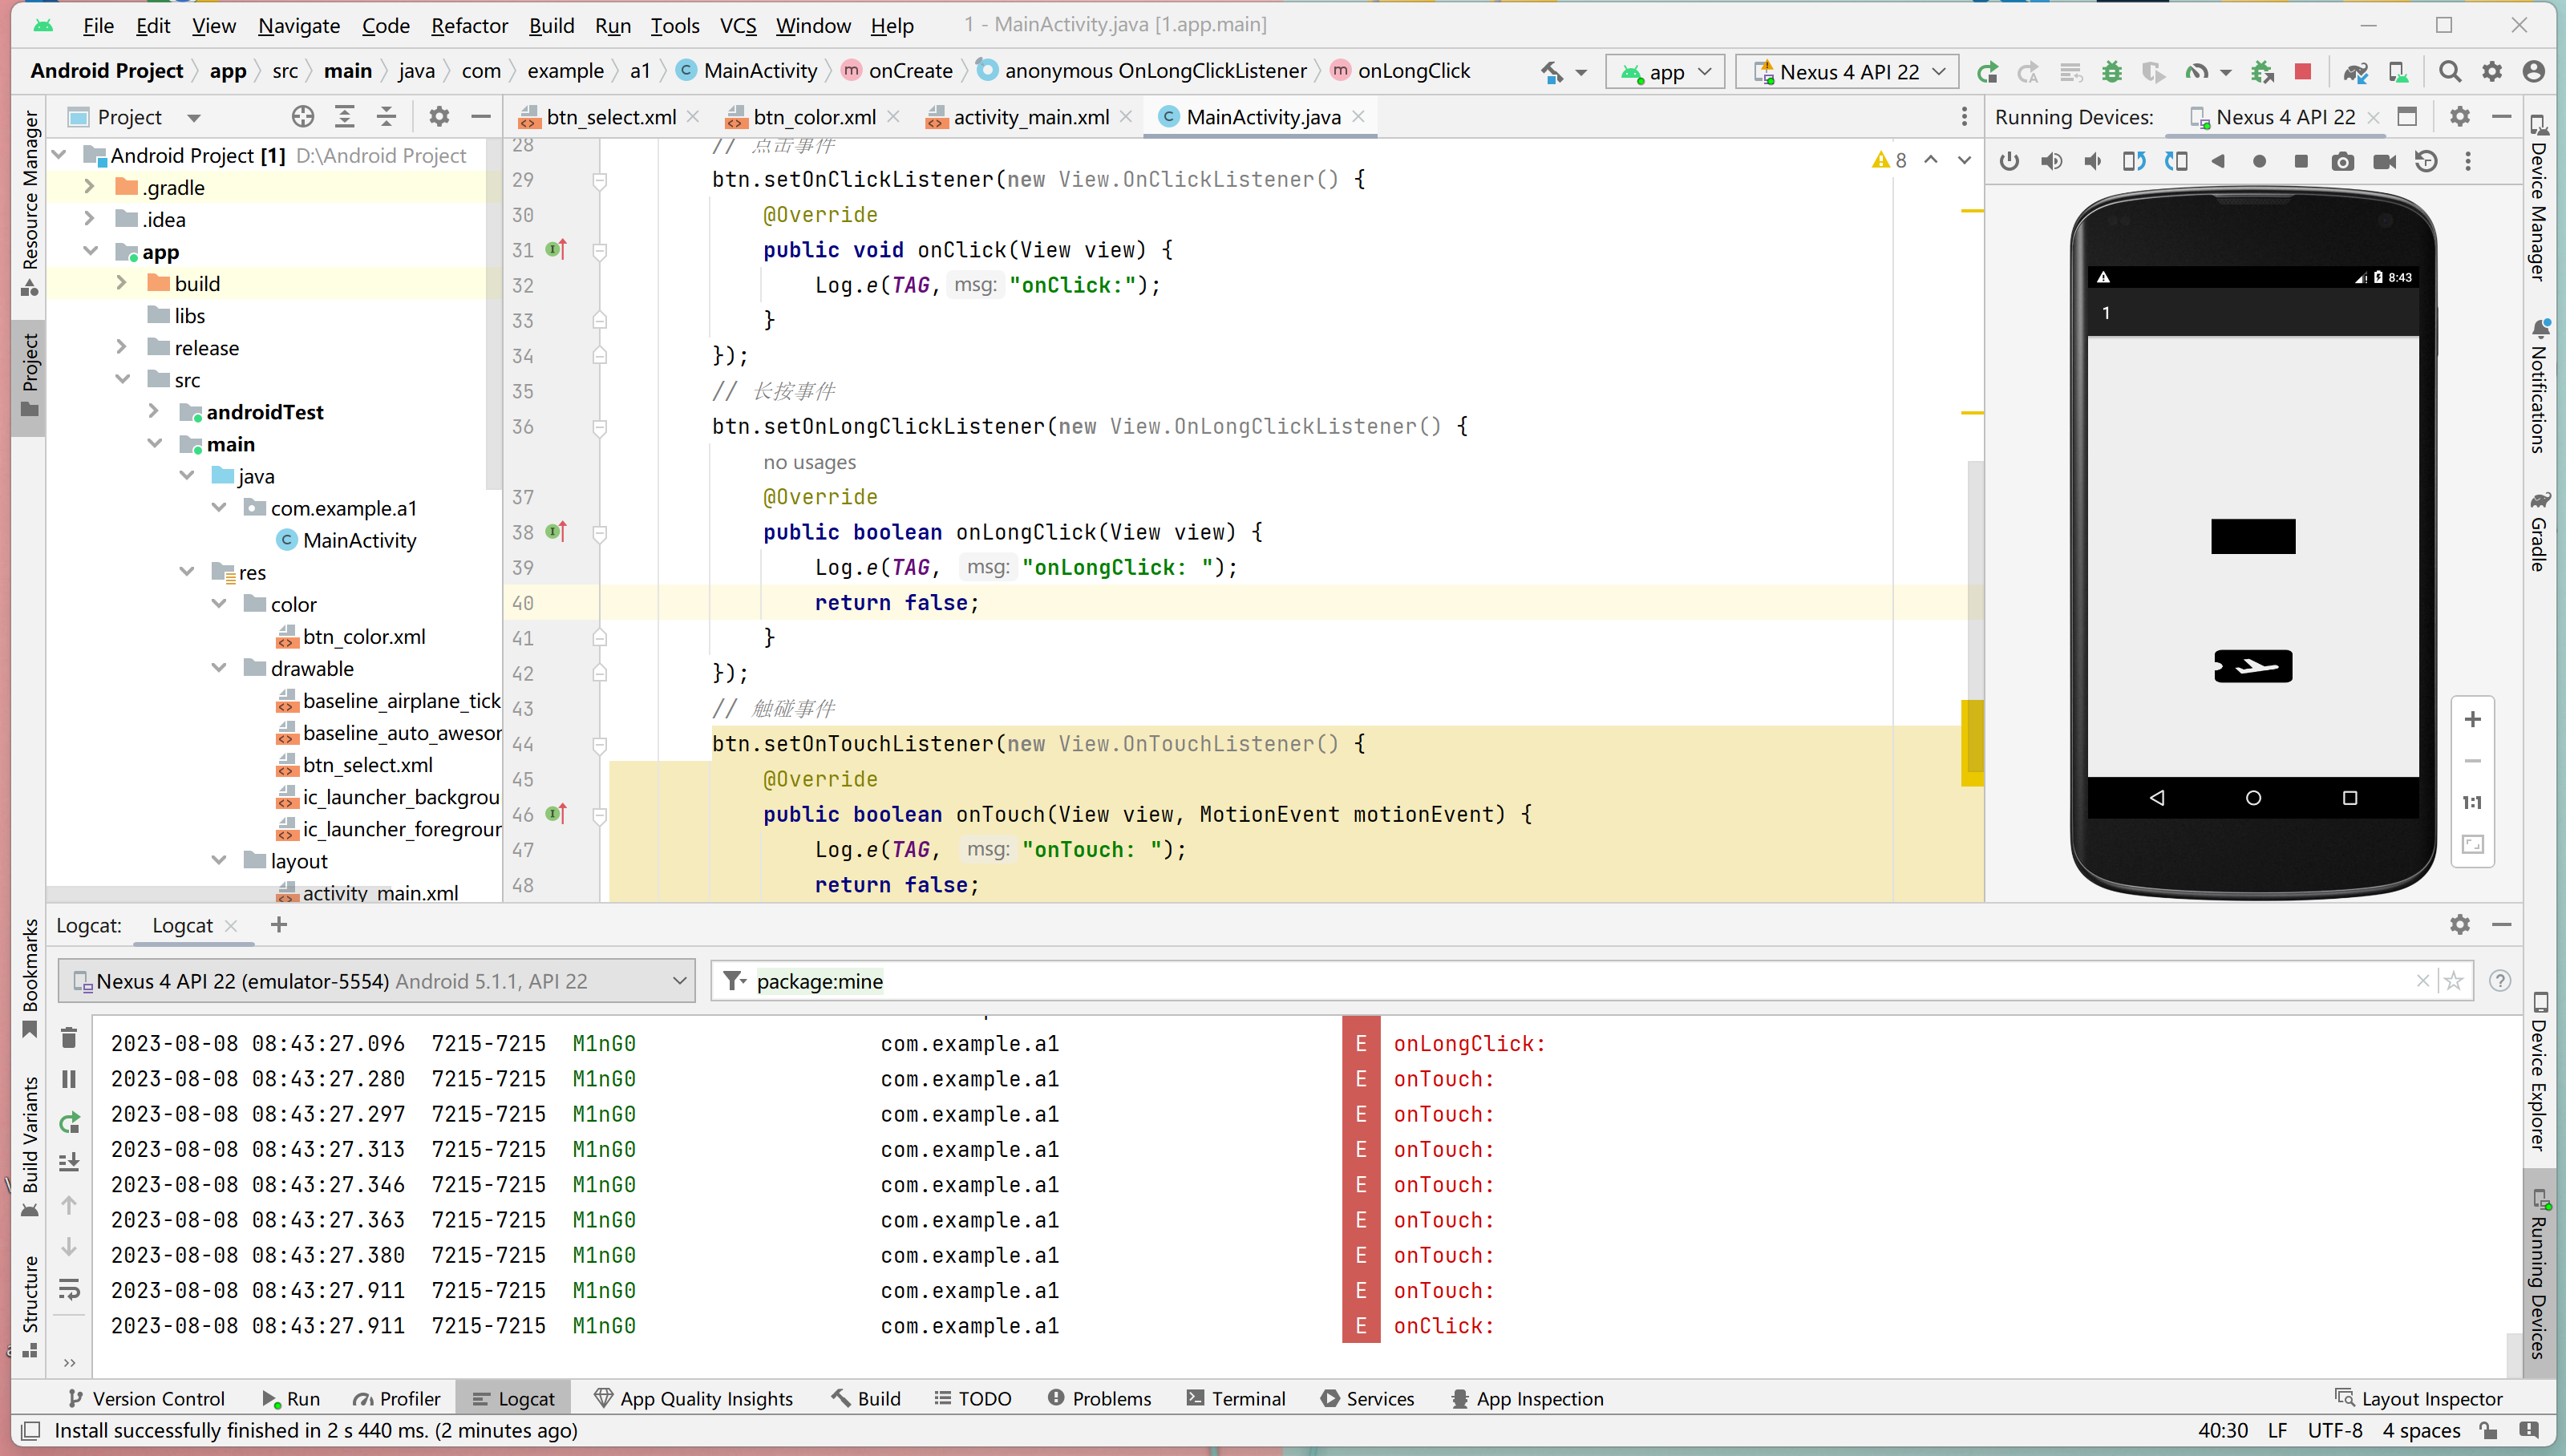
1 2 3 4 5 6 7 8 9 10 11 12 13 14 15 16 17 18 19 20 21 22 23 24 25 26 27 28 29 30 31 32 33 34 35 36 37 38 39 40 41 42 43 44 45 46 47 48 49 50 51 52 package com.example.a1;import static android.content.ContentValues.TAG;import androidx.appcompat.app.AppCompatActivity;import android.nfc.Tag;import android.os.Bundle;import android.util.Log;import android.view.MotionEvent;import android.view.View;import android.widget.Button;import android.widget.TextView;public class MainActivity extends AppCompatActivity { private static final String TAG = "M1nG0" ; @Override protected void onCreate (Bundle savedInstanceState) { super .onCreate(savedInstanceState); setContentView(R.layout.activity_main); TextView phone1 = findViewById(R.id.phone1); phone1.setText("M1nG0" ); Button btn = findViewById(R.id.btn); btn.setOnClickListener(new View .OnClickListener() { @Override public void onClick (View view) { Log.e(TAG,"onClick:" ); } }); btn.setOnLongClickListener(new View .OnLongClickListener() { @Override public boolean onLongClick (View view) { Log.e(TAG, "onLongClick: " ); return false ; } }); btn.setOnTouchListener(new View .OnTouchListener() { @Override public boolean onTouch (View view, MotionEvent motionEvent) { Log.e(TAG, "onTouch: " ); return false ; } }); } }
三种事件的不同回显
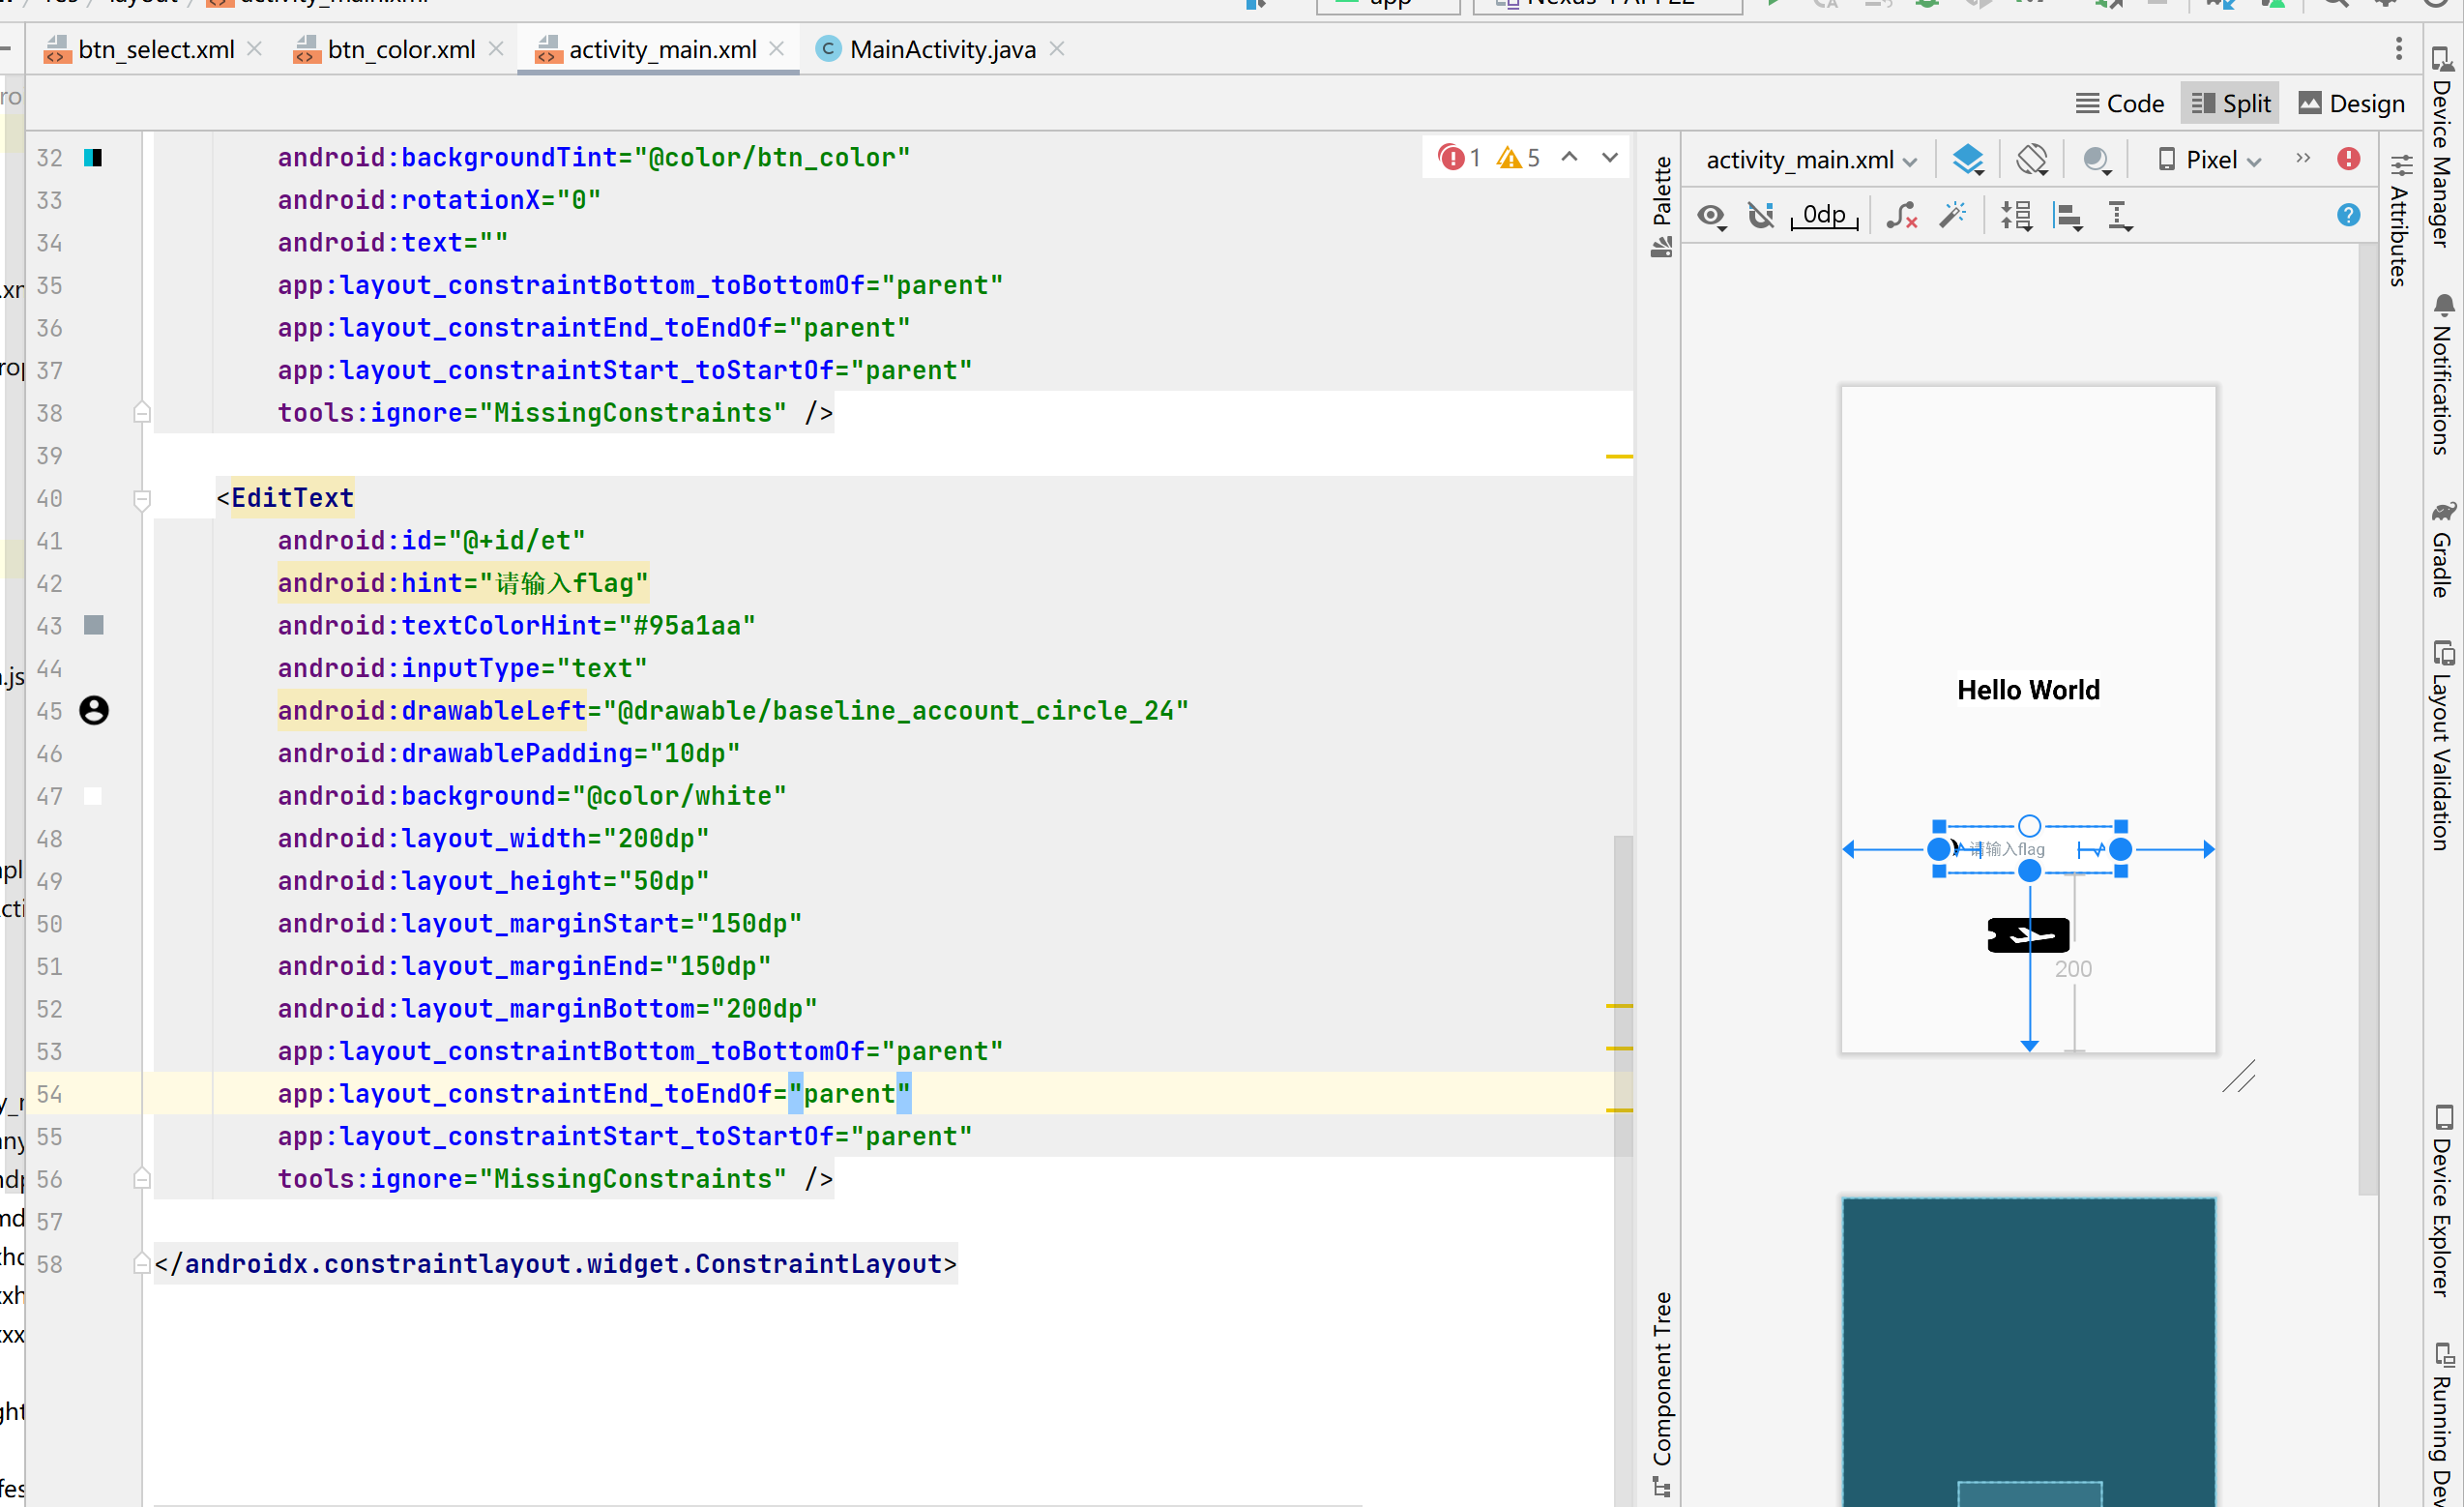
EditText 1 2 3 4 5 6 7 8 9 10 11 12 13 14 15 16 17 <EditText android:id ="@+id/et" // 控件ID android:hint ="请输入flag" // 提示文本 android:textColorHint ="#95a1aa" // 提示文本颜色 android:inputType ="text" // 限制输入类型 android:drawableLeft ="@drawable/baseline_account_circle_24" // 设置输入框左侧图标 android:drawablePadding ="10dp" //设置左侧图标与输出框间的距离 android:background ="@color/white" // 背景颜色 android:layout_width ="200dp" // 宽度 android:layout_height ="50dp" // 长度 android:layout_marginStart ="150dp" // 输入框位置设置 android:layout_marginEnd ="150dp" android:layout_marginBottom ="200dp" app:layout_constraintBottom_toBottomOf ="parent" app:layout_constraintEnd_toEndOf ="parent" app:layout_constraintStart_toStartOf ="parent" tools:ignore ="MissingConstraints" />
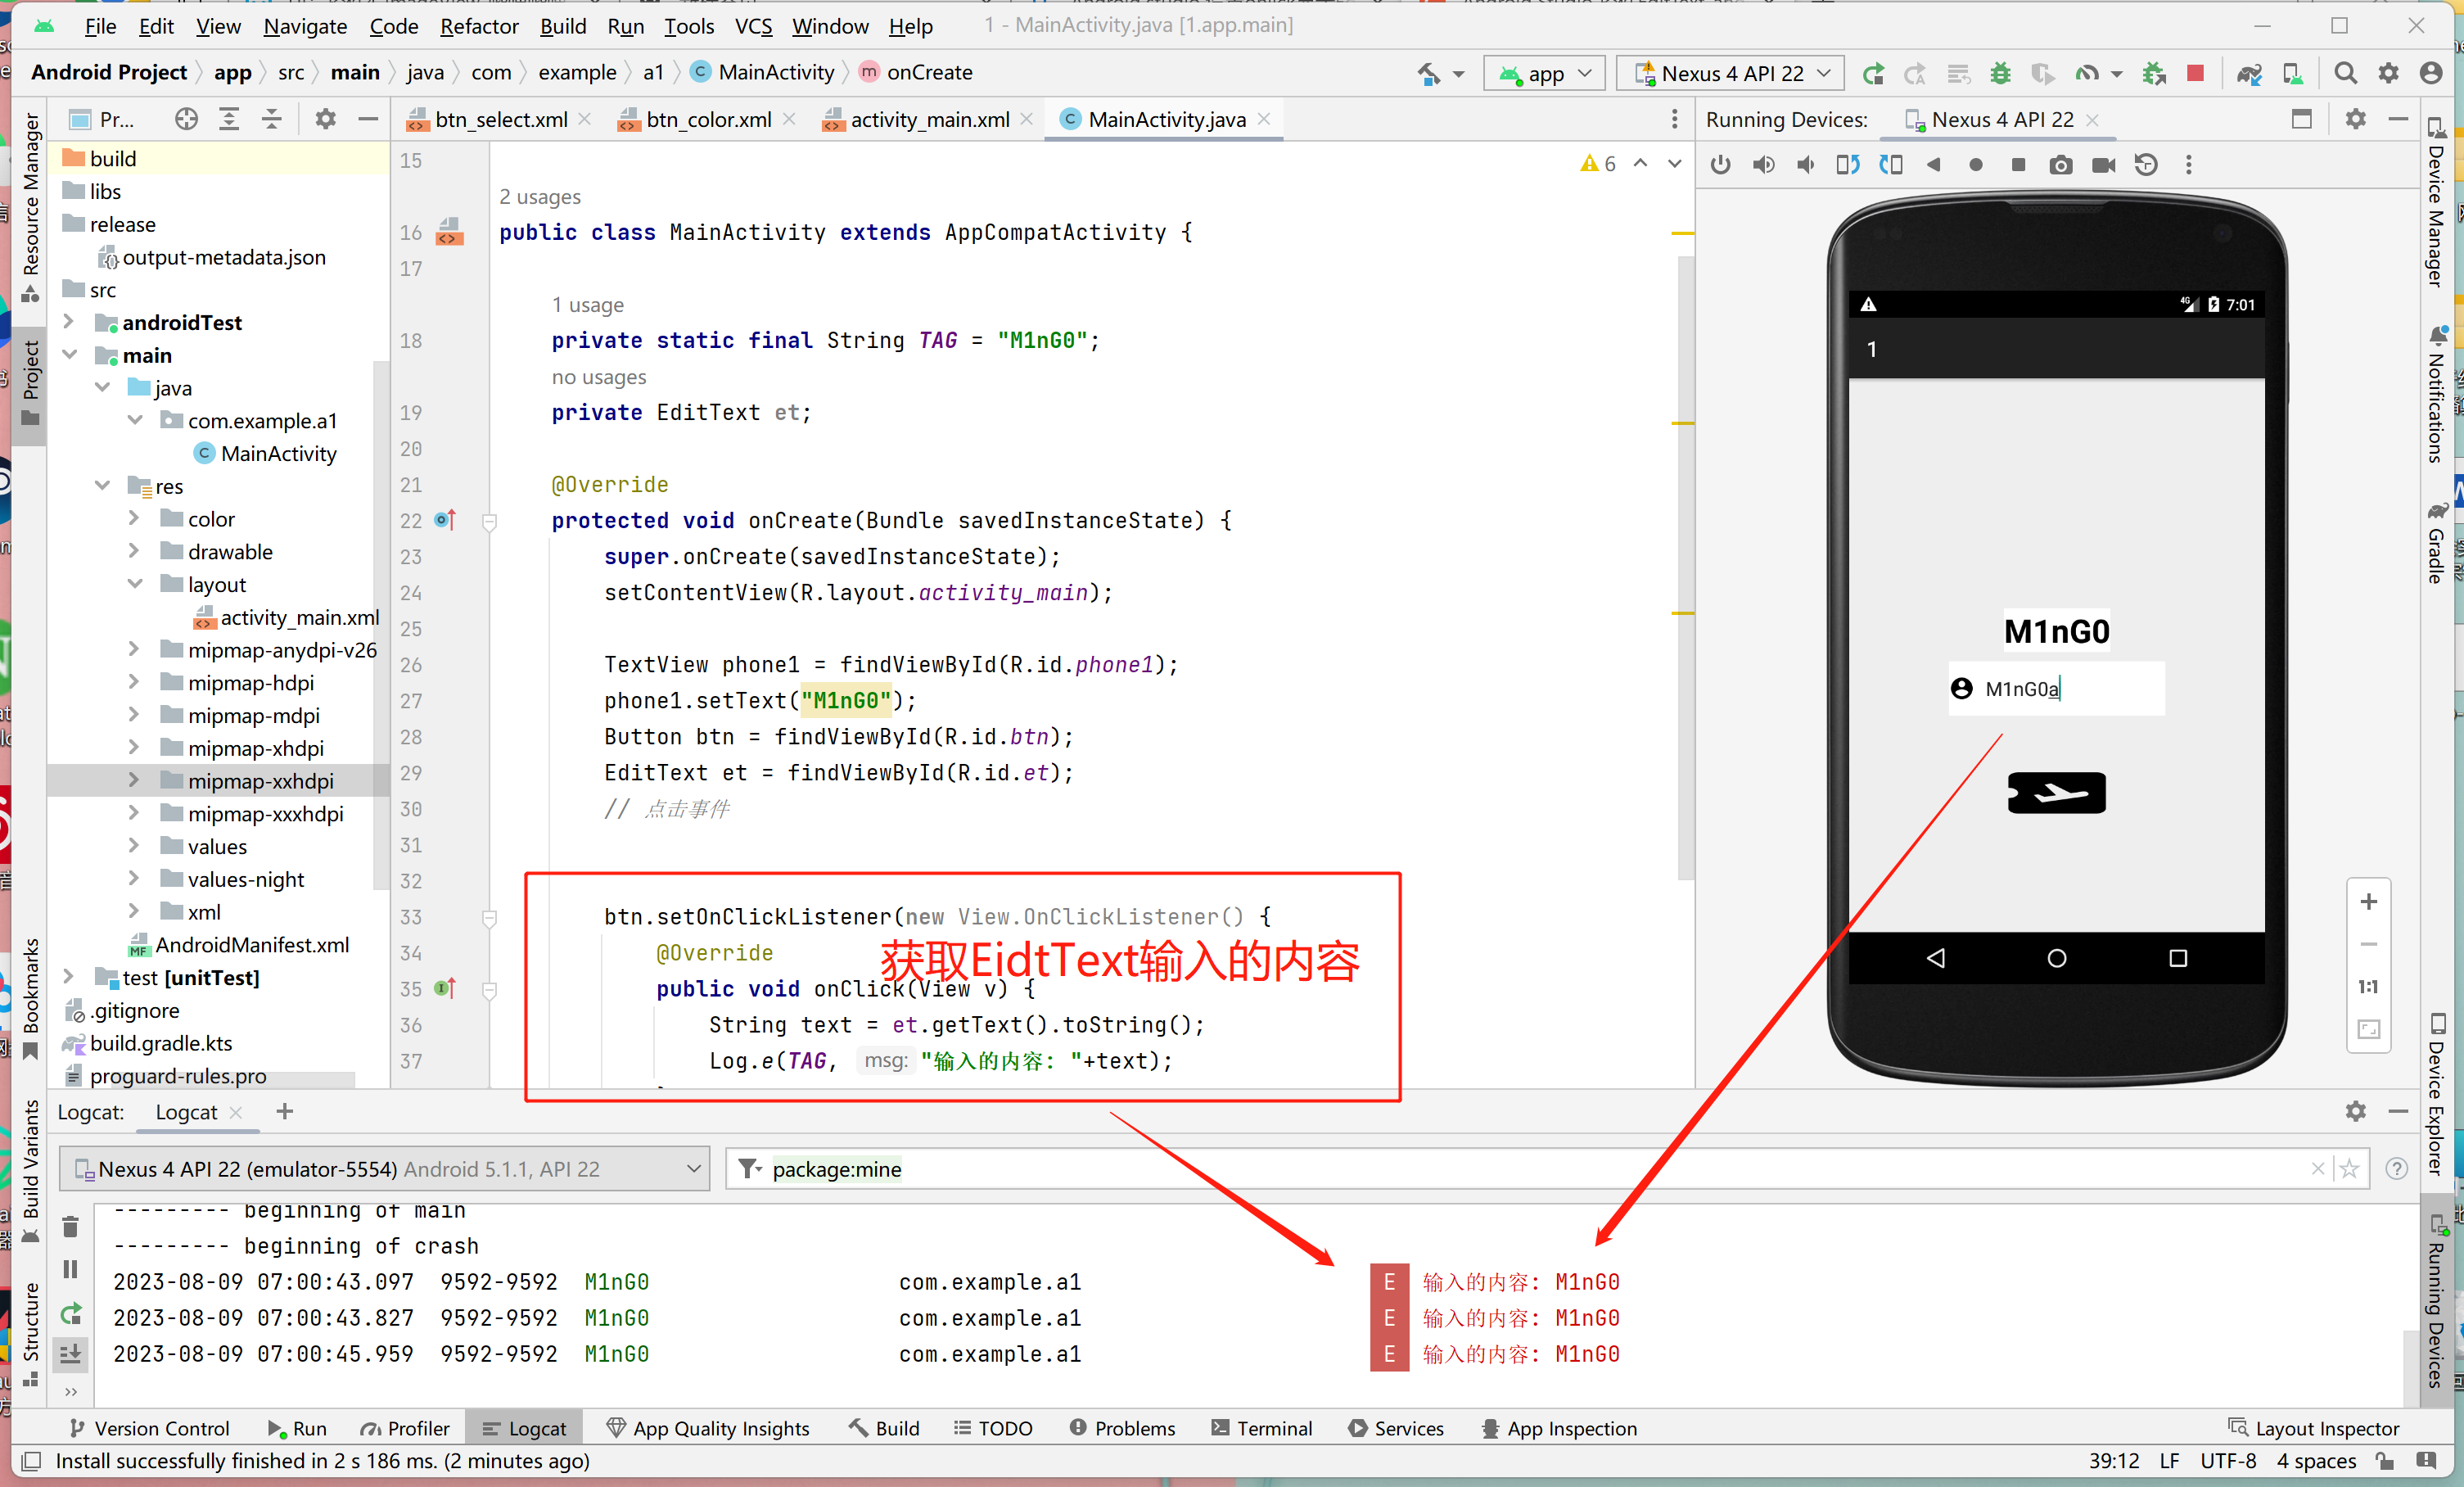
在主函数中调用输入框控件
并设置按钮回显输入框中的内容
1 2 3 4 5 6 7 8 9 10 11 12 13 14 15 16 17 18 19 20 21 22 23 24 25 26 ublic class MainActivity extends AppCompatActivity { private static final String TAG = "M1nG0" ; private EditText et; @Override protected void onCreate (Bundle savedInstanceState) { super .onCreate(savedInstanceState); setContentView(R.layout.activity_main); TextView phone1 = findViewById(R.id.phone1); phone1.setText("M1nG0" ); Button btn = findViewById(R.id.btn); EditText et = findViewById(R.id.et); btn.setOnClickListener(new View .OnClickListener() { @Override public void onClick (View v) { String text = et.getText().toString(); Log.e(TAG, "输入的内容: " +text); } }); } }
ImageView 1 2 3 4 5 6 7 8 9 10 <ImageView android:layout_width ="410dp" // 宽度 android:layout_height ="210dp" // 长度 android:adjustViewBounds ="true" //允许调整最大长宽 android:maxWidth ="100dp" // 最大宽度 android:maxHeight ="300dp" // 最大长度 android:scaleType ="centerInside" // 图片缩放样式 android:src ="@drawable/csshi" // 图片选择 app:layout_constraintTop_toTopOf ="parent" tools:ignore ="MissingConstraints" />
NDK NDK是什么 在Android中,NDK是一系列工具的集合,主要用于扩展Android SDK。NDK提供了一系列的工具可以帮助开发者快速的开发C或C++的动态库,并能自动将so和Java应用一起打包成apk。同时,NDK还集成了交叉编译器,并提供了相应的mk文件隔离CPU、平台、ABI等差异,开发人员只需要简单修改mk文件(指出“哪些文件需要编译”、“编译特性要求”等),就可以创建出so文件。
NDK配置 在Android Studio中依次选择”Tools”-“SDK Manager`”-“SDK tools”下载NDK
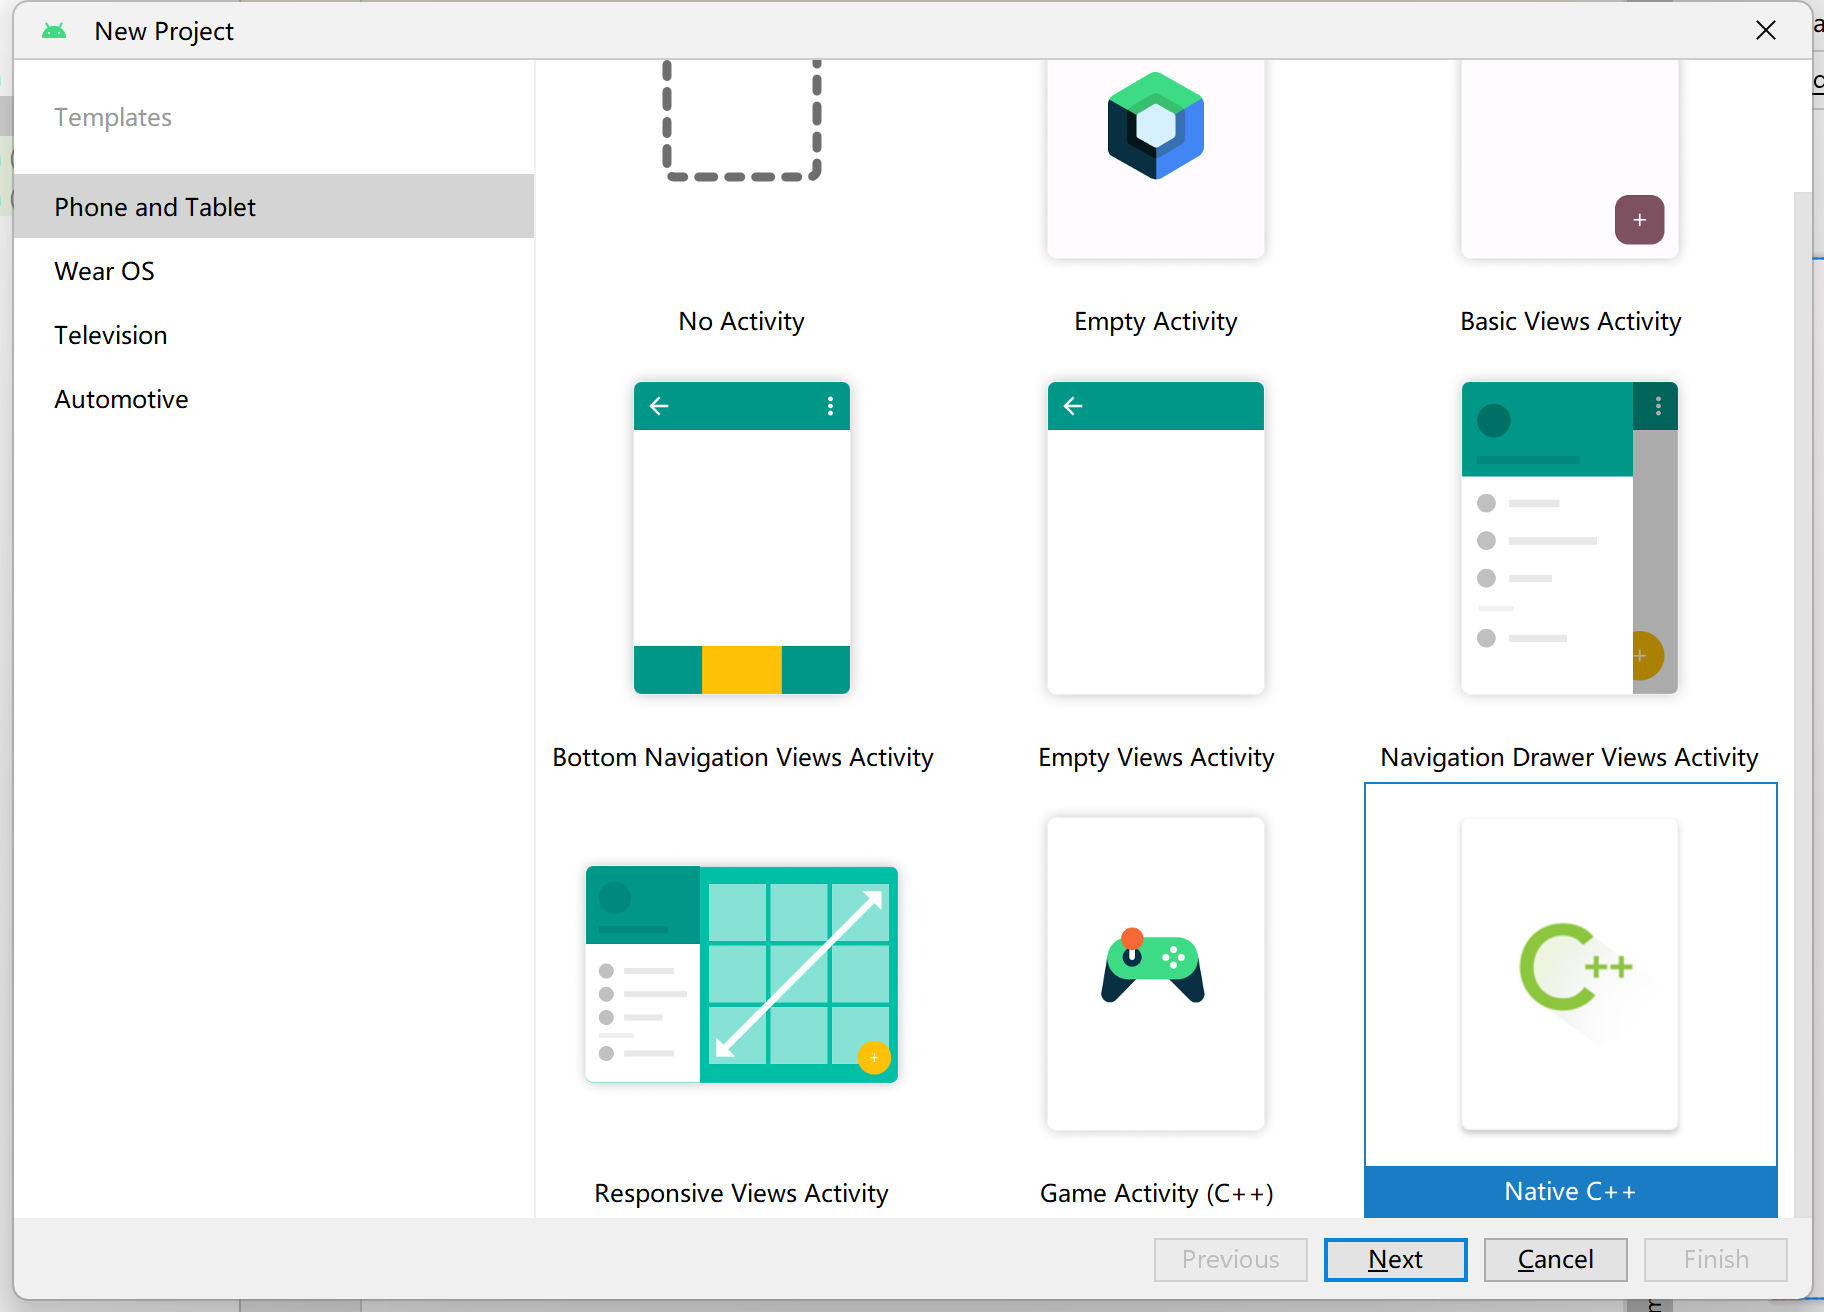
创建一个Native C++工程
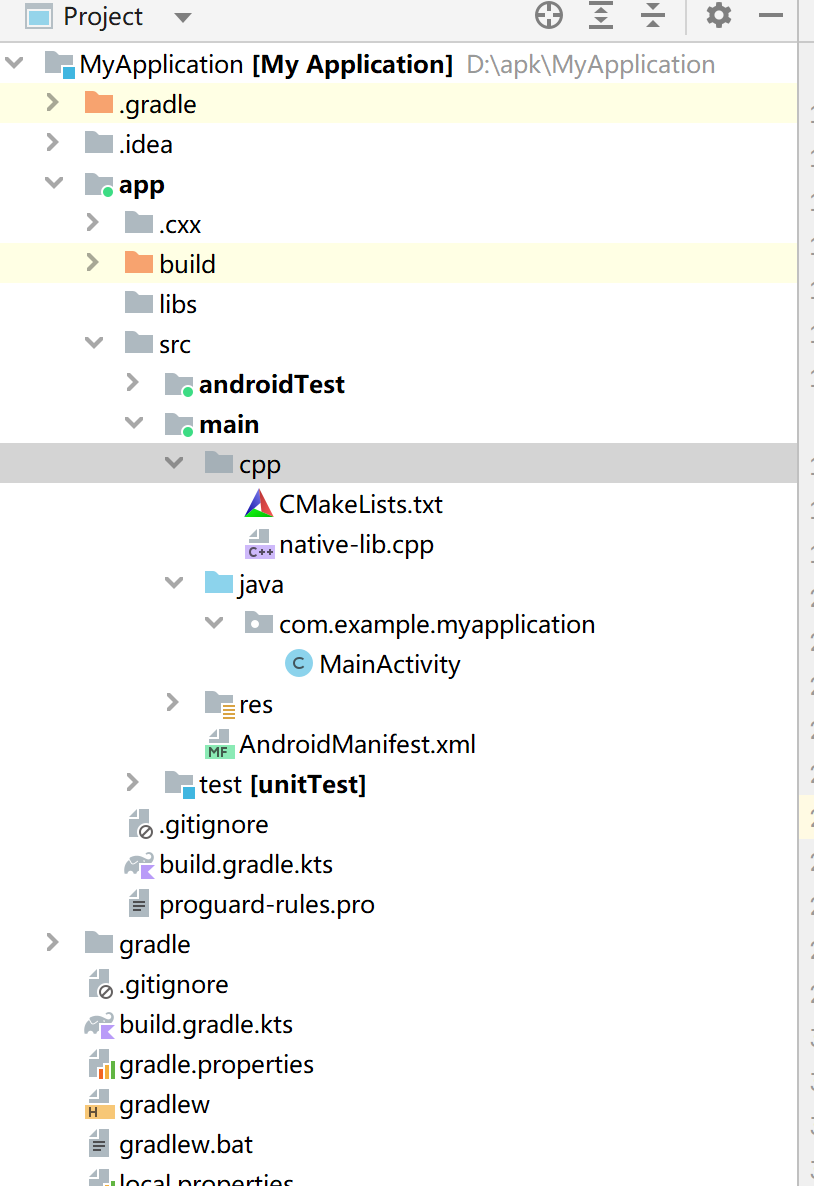
工程目录如下
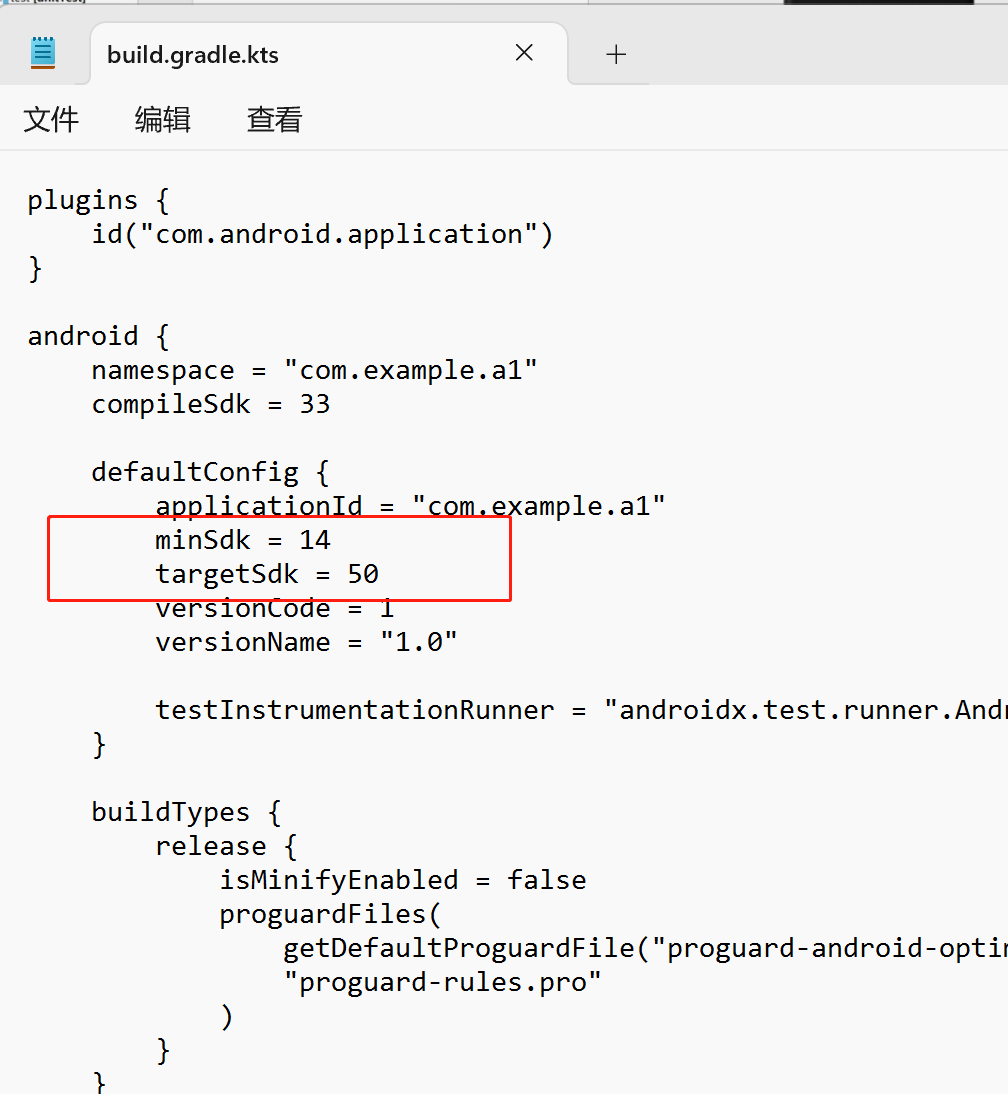
所遇到的一些问题及解决方法 INSTALL_FAILED_OLDER_SDK 完整报错信息:
1
2
3
4
5
Installation did not succeed. The application could not be installed: INSTALL_FAILED_OLDER_SDK The application’s minSdkVersion is newer than the device API level. Retry 意思是我使用的设备的sdk版本低于要求的sdk版本
解决方法:
修改里面的内容 minSdkVersion
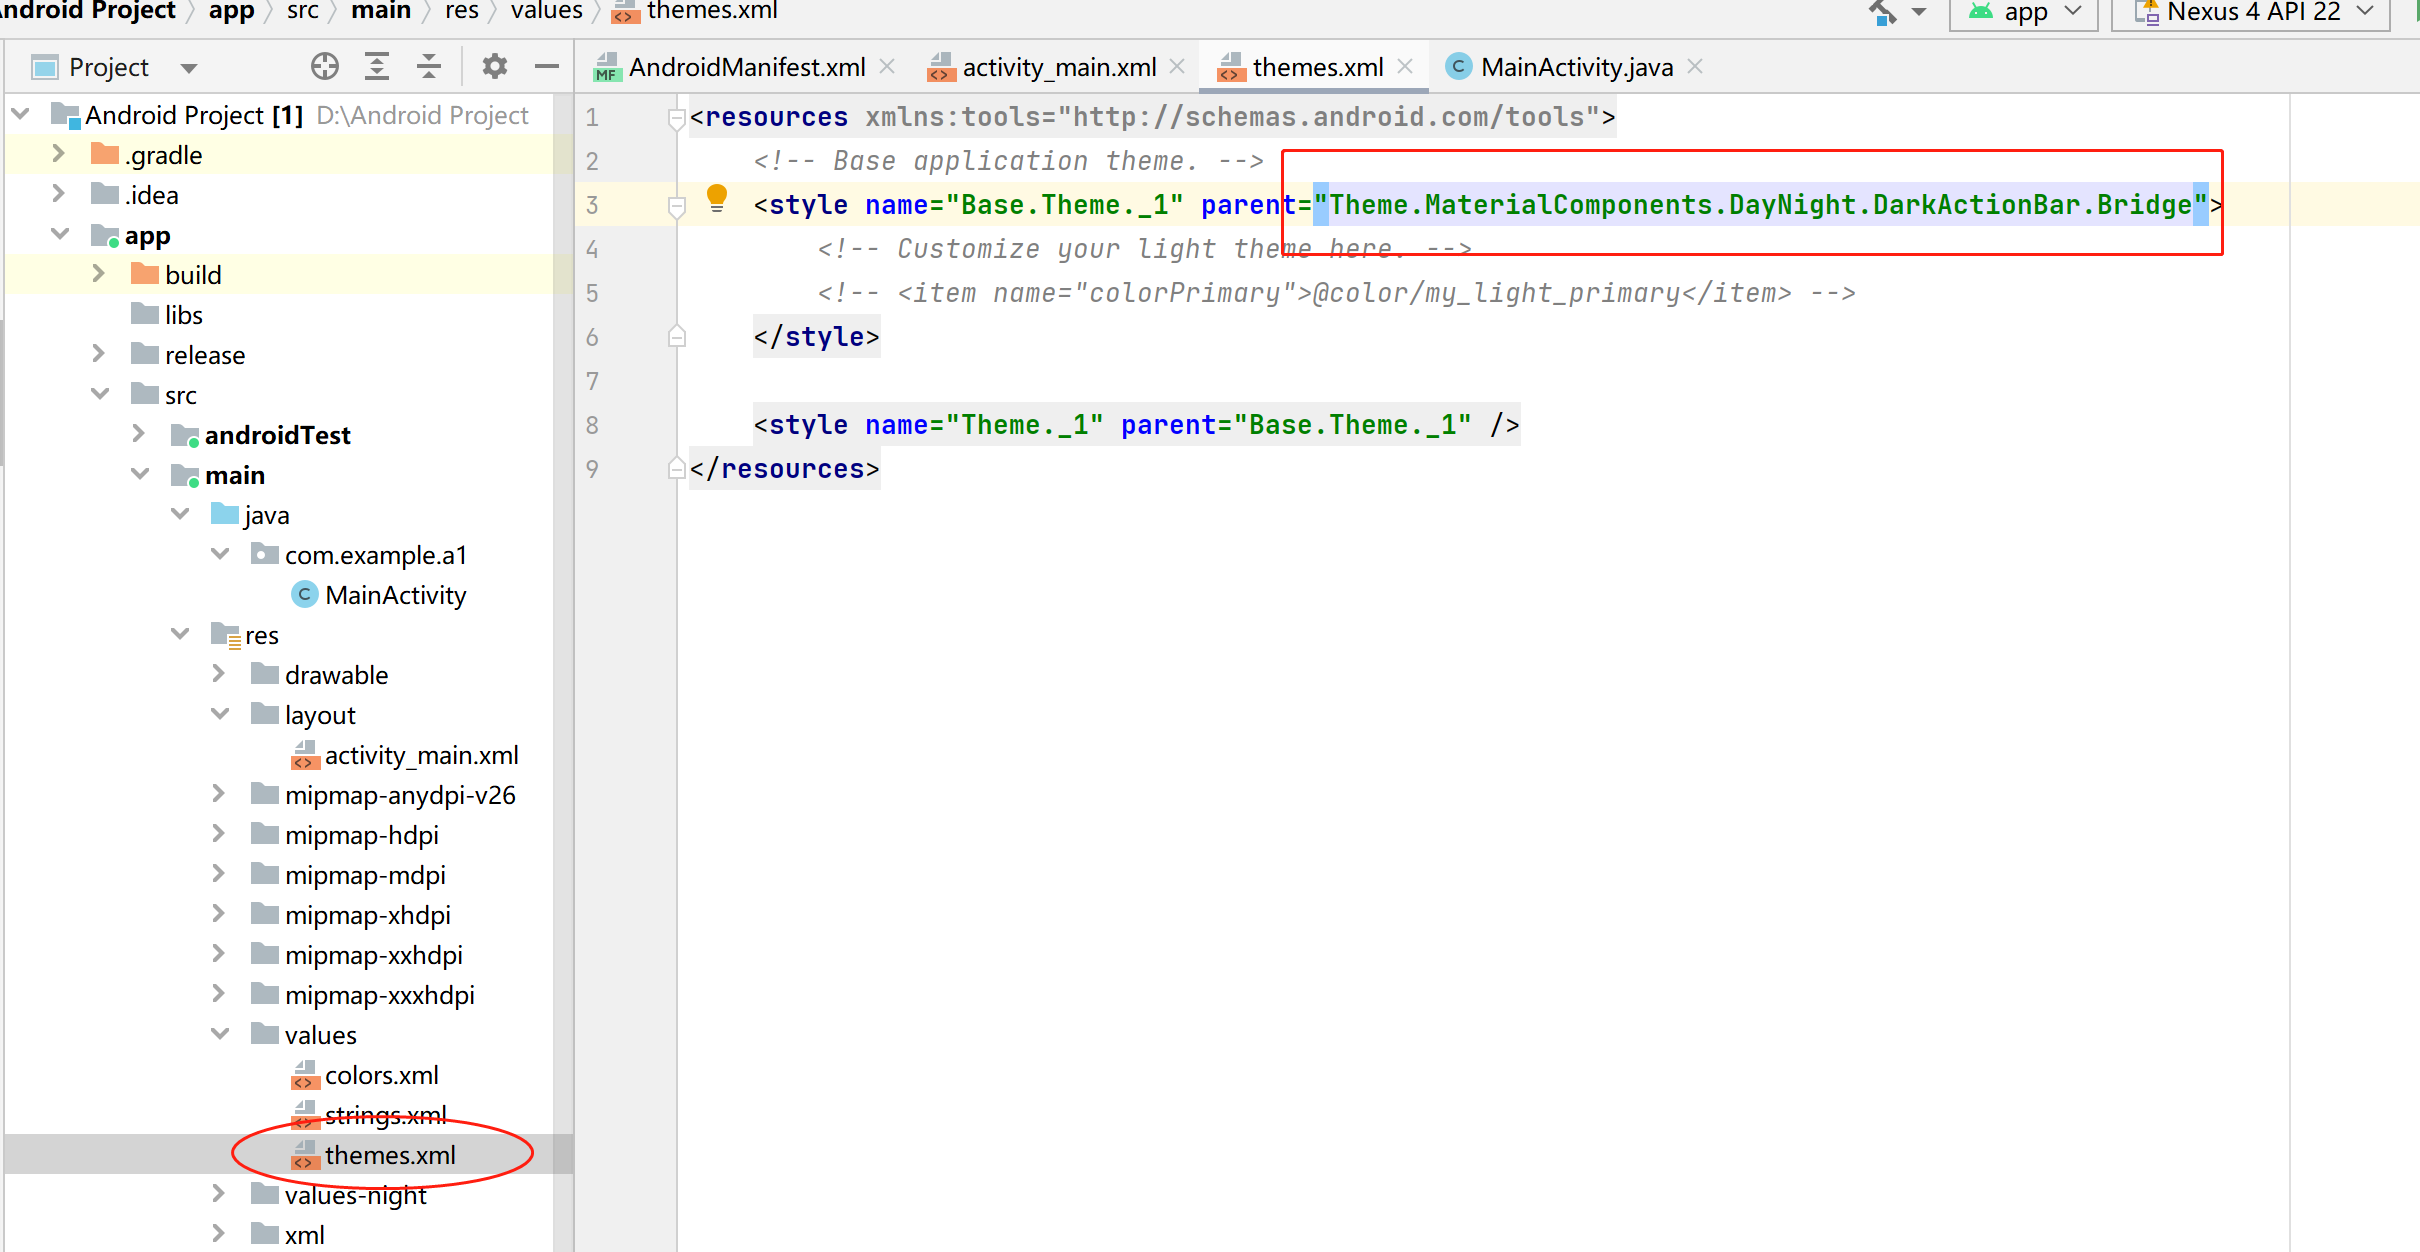
如图所示 代码中将按钮背景颜色设置为黑色却不显示
解决方法:
修改文件
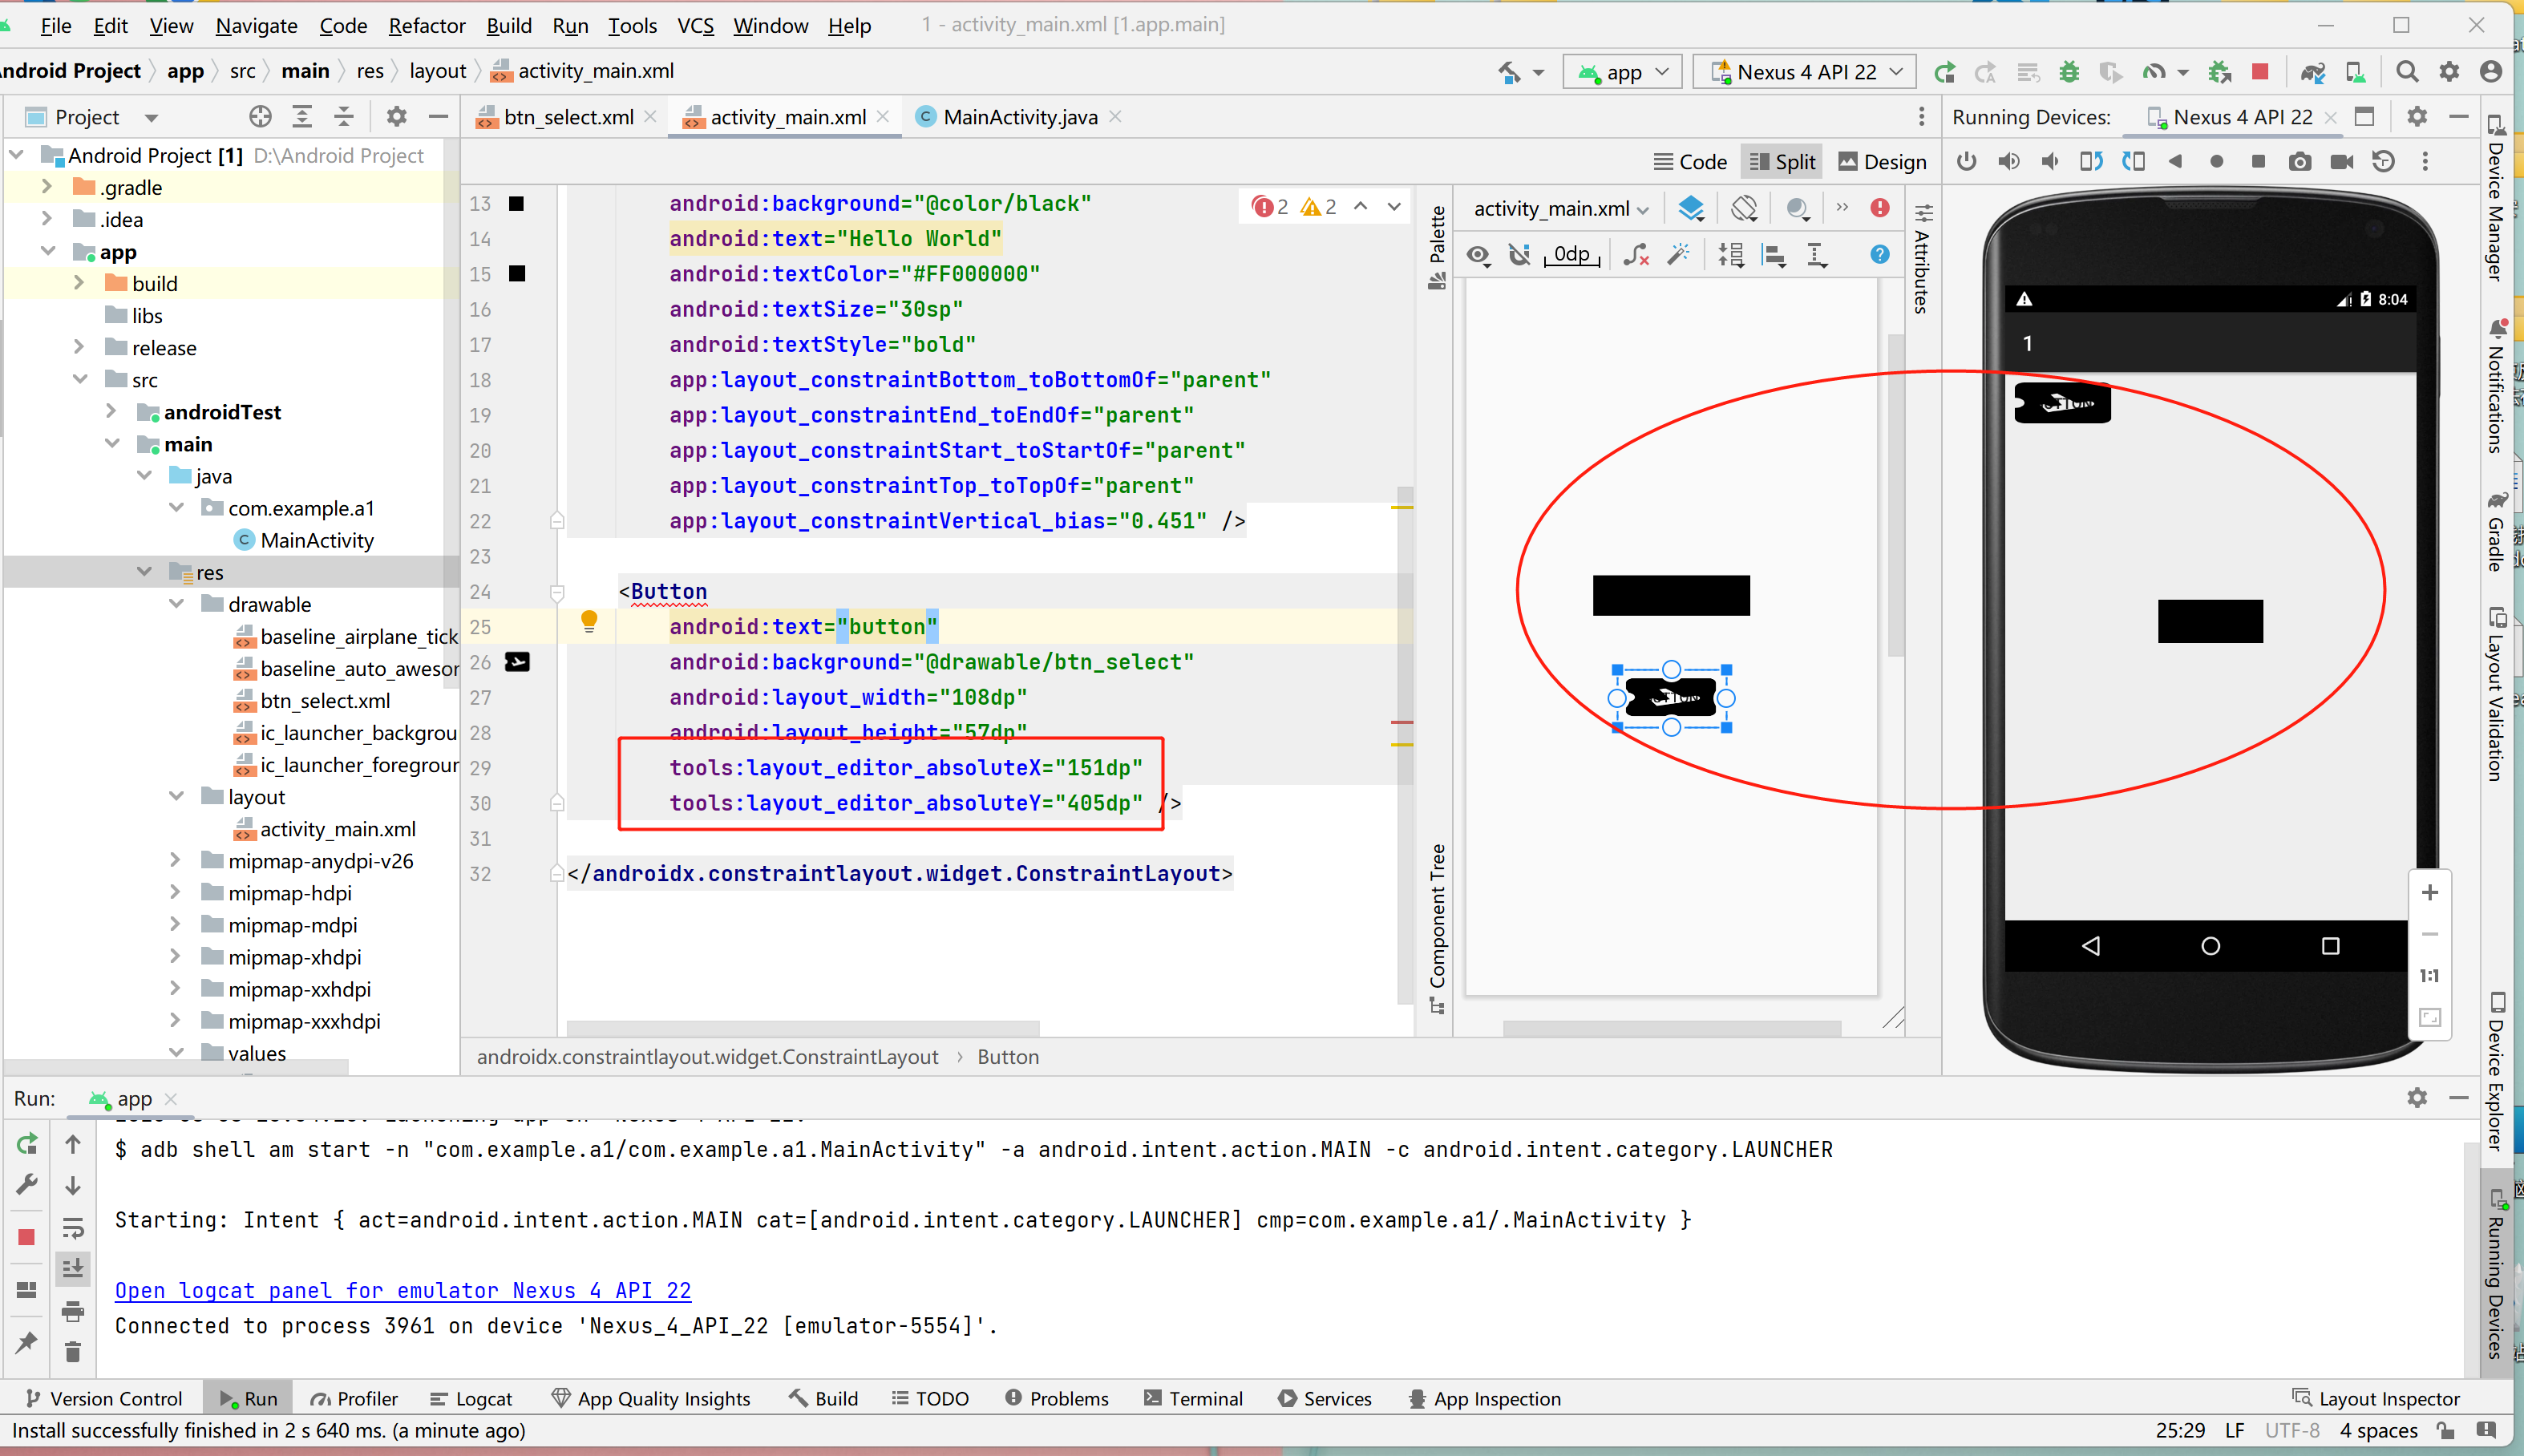
使用layout_editor_absolutX/Y 直接设置按钮位置发现预览正确但是实际没有效果
解决方法:
使用layout_marginStart 和layout_constraintStart_toStartOf 或在Design 视图中直接调节


 wechat
 alipay